IT Disaster Recovery and Business Continuity Plan Template for Word
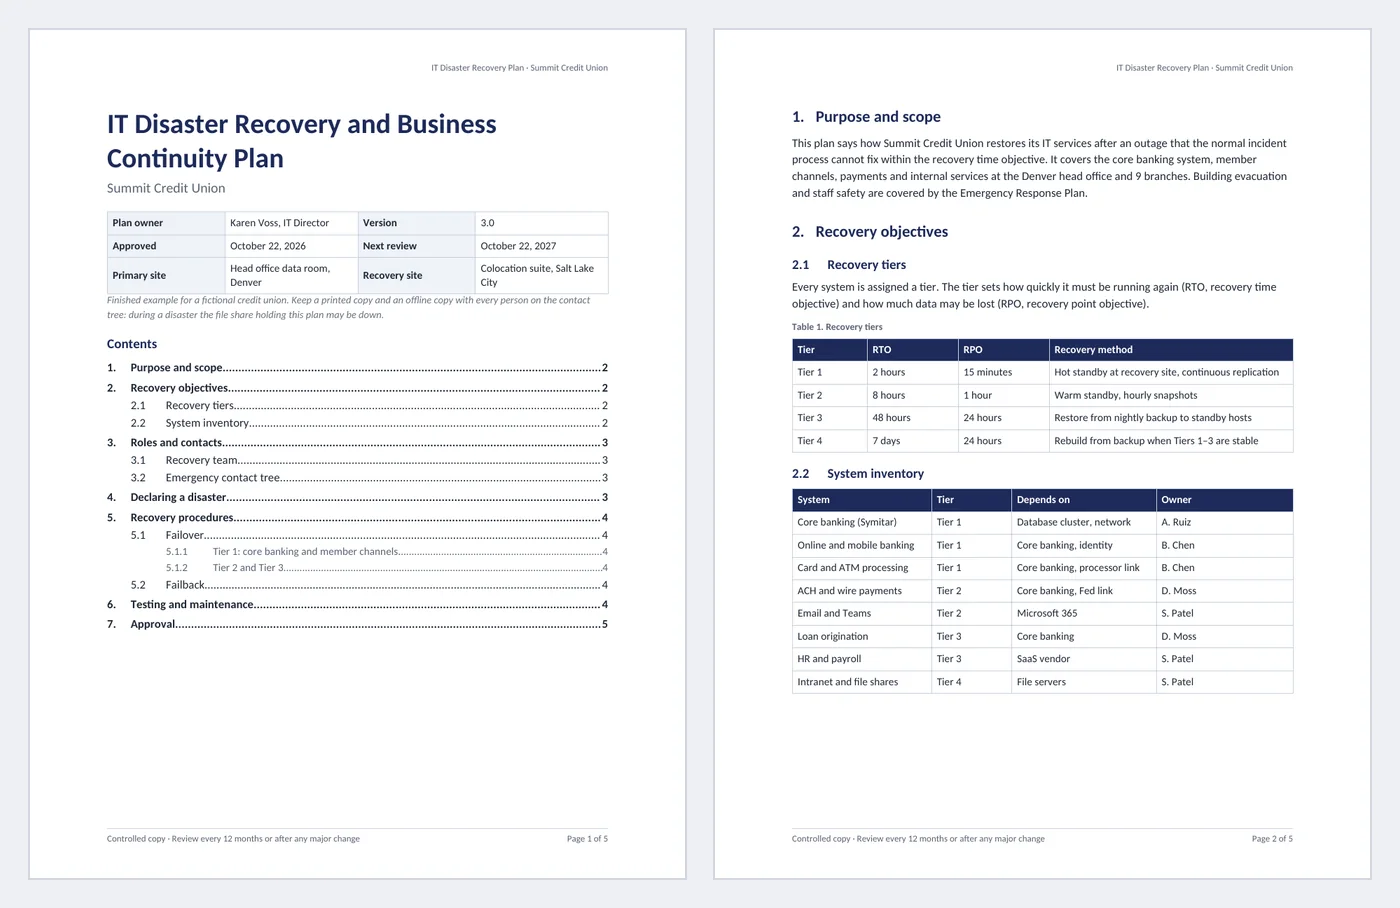
A disaster recovery plan has to work at 3 a.m. for someone who is stressed and may not have written it. That means four things on paper: how fast each system must be back, who calls whom, when a disaster is officially declared, and the exact steps to fail over. This template is a finished five-page example for a fictional credit union, with recovery tiers, a tiered system inventory, a contact tree with backups, numbered runbooks and a test schedule that examiners can check.
- Pages:
- 5
- Works with:
- Word for Microsoft 365, Word 2016 or later, Word for Mac (Word for the web can fill in fields)
- Updated:
IT Disaster Recovery Plan Template.docx
Free to download. No sign-up needed. No macros.
What you can do with it
- Recovery tiers table with RTO (recovery time objective) and RPO (recovery point objective) for each tier
- System inventory with a tier dropdown per system, dependencies and owners
- Recovery team, emergency contact tree with backups, and declaration criteria with a trigger dropdown
- Numbered failover steps per tier, failback rules, test schedule with date pickers and result dropdowns, and approval
What's inside
The document has 5 pages. Each part below is a heading in the file, so you can jump to it from the Navigation Pane (View > Navigation Pane).
| Part | What it covers | What you write |
|---|---|---|
| Plan control and contents | Which version is in force | Owner, version, approval and review dates, primary and recovery sites |
| 1–2. Scope and objectives | What is covered and how fast it must recover | Tiers with RTO and RPO; system inventory |
| 3. Roles and contacts | Who does what and how to reach them | Recovery team, contact tree with backups |
| 4. Declaring a disaster | When the plan starts | Criteria and a declaration record |
| 5. Recovery procedures | How to fail over and back | Numbered steps for Tier 1 and Tiers 2–3; failback rules |
| 6–7. Testing and approval | Proof the plan works | Test schedule with dates and results; three signatures |
Before you start
- Run a business impact analysis first: ask each department how long it can work without each system and how much data it can afford to re-enter.
- Confirm what your backups and replication can actually deliver; an RTO the infrastructure cannot meet is fiction.
- Collect current phone numbers, including personal mobiles, for everyone on the contact tree.
Step-by-step guide
Set the tiers
Agree RTO and RPO for each tier with the business, and the recovery method that delivers them.
Classify every system
List each system, pick its tier from the dropdown, and note what it depends on and who owns it. A system’s tier can never be better than the tier of what it depends on.
Build the contact tree
Name the recovery team and fill in the call tree with a backup for every person.
Write the trigger rules
List the events that make the coordinator declare a disaster, so nobody waits for permission.
Write the runbooks
Number every failover step in the order it is done, with the check that proves it worked. Write failback as a planned change.
Schedule tests and approve
Pick the test dates, record each result from the dropdown after the test, and get the plan approved and printed.
Field and control map
Every content control and field in the document, in the order they appear. Gray-boxed fields in Word are the content controls.
| Name | Type | Where | Value in the sample |
|---|---|---|---|
| Organization header | Text | Header | Summit Credit Union |
| Organization | Text | Body | Summit Credit Union |
| Plan owner | Text | Body | Karen Voss, IT Director |
| Version | Text | Body | 3.0 |
| Approved date | Date picker | Body | October 22, 2026 |
| Next review | Date picker | Body | October 22, 2027 |
| Primary site | Text | Body | Head office data room, Denver |
| Recovery site | Text | Body | Colocation suite, Salt Lake City |
| Tier core | Dropdown | Body | Tier 1 (Tier 1 / Tier 2 / Tier 3 / Tier 4) |
| Tier online | Dropdown | Body | Tier 1 (Tier 1 / Tier 2 / Tier 3 / Tier 4) |
| Tier card | Dropdown | Body | Tier 1 (Tier 1 / Tier 2 / Tier 3 / Tier 4) |
| Tier ach | Dropdown | Body | Tier 2 (Tier 1 / Tier 2 / Tier 3 / Tier 4) |
| Tier email | Dropdown | Body | Tier 2 (Tier 1 / Tier 2 / Tier 3 / Tier 4) |
| Tier loan | Dropdown | Body | Tier 3 (Tier 1 / Tier 2 / Tier 3 / Tier 4) |
| Tier hr | Dropdown | Body | Tier 3 (Tier 1 / Tier 2 / Tier 3 / Tier 4) |
| Tier intranet | Dropdown | Body | Tier 4 (Tier 1 / Tier 2 / Tier 3 / Tier 4) |
| DR coordinator | Text | Body | Karen Voss |
| Infra lead | Text | Body | Alex Ruiz |
| Apps lead | Text | Body | Bea Chen |
| Comms lead | Text | Body | Maya Ortiz |
| Declared by | Text | Body | Click or tap to enter text. |
| Declared date | Date picker | Body | Click or tap to enter a date. |
| Trigger | Dropdown | Body | Select a trigger (Tier 1 outage / Site unavailable / Data corruption or ransomware / Vendor outage / Other) |
| Test calltree | Date picker | Body | January 15, 2027 |
| Result calltree | Dropdown | Body | Passed (Not run / Passed / Passed with issues / Failed) |
| Test restore | Date picker | Body | January 22, 2027 |
| Result restore | Dropdown | Body | Passed (Not run / Passed / Passed with issues / Failed) |
| Test tabletop | Date picker | Body | March 10, 2027 |
| Result tabletop | Dropdown | Body | Passed with issues (Not run / Passed / Passed with issues / Failed) |
| Test failover | Date picker | Body | May 16, 2027 |
| Result failover | Dropdown | Body | Not run (Not run / Passed / Passed with issues / Failed) |
| Approver IT | Text | Body | Karen Voss |
| Signed date | Date picker | Body | 3 fields: Click or tap to enter a date. |
| Approver CEO | Text | Body | Linda Ames |
| Approver board | Text | Body | Robert Klein |
{ TOC \o "1-3" \h \z \u } | Field | Body | contents list |
{ PAGE } | Field | Footer | 1 |
{ NUMPAGES } | Field | Footer | 5 |
{ SEQ Table \* ARABIC } | Field | Body | 1, 2 |
Every field, control and style, explained
The code in each card is read straight from the .docx file (the XML Word stores, or the field code you see with Alt+F9), so it is exactly what the template contains.
<w:lvl w:ilvl="0">
  <w:start w:val="1"/>
  <w:numFmt w:val="decimal"/>
  <w:pStyle w:val="Heading1"/>
  <w:lvlText w:val="%1."/>
  <w:lvlJc w:val="left"/>
  <w:pPr>
    <w:ind w:left="440" w:hanging="440"/>
  </w:pPr>
</w:lvl>
<w:lvl w:ilvl="1">
  <w:start w:val="1"/>
  <w:numFmt w:val="decimal"/>
  <w:pStyle w:val="Heading2"/>
  <w:lvlText w:val="%1.%2"/>
  <w:lvlJc w:val="left"/>
  <w:pPr>
    <w:ind w:left="660" w:hanging="660"/>
  </w:pPr>
</w:lvl>
<w:lvl w:ilvl="2">
  <w:start w:val="1"/>
  <w:numFmt w:val="decimal"/>
  <w:pStyle w:val="Heading3"/>
  <w:lvlText w:val="%1.%2.%3"/>
  <w:lvlJc w:val="left"/>
  <w:pPr>
    <w:ind w:left="880" w:hanging="880"/>
  </w:pPr>
</w:lvl>
The section numbers (1., 2., 6.1 …) are not typed. A multilevel list is linked to the Heading 1, Heading 2 and Heading 3 styles, so any paragraph you set to Heading 1 gets the next number and the table of contents picks it up.
Piece by piece
<w:pStyle w:val="Heading1"/>- Links list level 1 to the Heading 1 style (level 2 to Heading 2).
<w:lvlText w:val="%1."/>- Level 1 shows its counter and a period: 1., 2., 3.
<w:lvlText w:val="%1.%2"/>- Level 2 shows the parent number, a period and its own counter: 6.1, 6.2.
<w:ind w:left="440" w:hanging="440"/>- Hanging indent so wrapped heading text lines up after the number.
<w:lvlText w:val="%1.%2.%3"/>- Level 3 (Heading 3) adds a third counter: 3.1.1, 3.1.2. It restarts under each new Heading 2.
In the sample: 1. Purpose and scope, 2. Recovery objectives, 2.1 Recovery tiers … (15 headings)
How it is used: To add a section, type the heading, then pick Heading 1 (Ctrl+Alt+1), Heading 2 (Ctrl+Alt+2) or Heading 3 (Ctrl+Alt+3) on the Home tab. Numbers after it update by themselves.
How to change it: Home > Multilevel List > Define New Multilevel List to change the format (for example "Section 1"). Keep "Link level to style" set to Heading 1 and Heading 2.
Learn this: How to Plan and Structure Long Documents in Word: Outline View and Multilevel Numbering →{ TOC \o "1-3" \h \z \u }A TOC field builds the contents list from the Heading 1, Heading 2 and Heading 3 paragraphs. The file ships with the entries and page numbers already filled in, so it looks right the moment you open it.
Piece by piece
\o "1-3"- Include heading levels 1 to 3.
\h- Make each entry a link to its heading (Ctrl+click in Word).
\z- Hide page numbers in Web Layout view.
\u- Use the paragraph outline level, so the styles decide what is listed.
In the sample: 15 entries. First: 1. Purpose and scope … page 2
How it is used: After you add or rename sections, right-click the contents list and choose Update Field > Update entire table.
How to change it: References > Table of Contents > Custom Table of Contents: set "Show levels" to 2 to leave Heading 3 out of the list.
Learn this: How to Add a Table of Contents, Captions, and Cross-References in Word →Page { PAGE } of { NUMPAGES }The footer counts pages with two fields: PAGE is the current page and NUMPAGES is the total. Both recalculate when the document is printed, saved as PDF or scrolled in Print Layout.
Piece by piece
PAGE- The number of the page the field sits on.
NUMPAGES- The total number of pages in the document.
In the sample: Page 1 of 5 on the first page
How it is used: Nothing to do: add or delete pages and the numbers follow.
How to change it: Double-click the footer to edit the text around the fields. Insert > Page Number > Format Page Numbers sets the starting number.
Learn this: How to Set Up Pages in Word: Margins, Breaks, Headers, Footers, and Page Numbers →{ SEQ Table \* ARABIC }Each table caption uses a SEQ field that counts tables in order. Insert a new captioned table in the middle and every later caption renumbers.
Piece by piece
SEQ Table- A counter named "Table". Every SEQ Table field adds 1.
\* ARABIC- Show the counter as 1, 2, 3.
In the sample: 2 caption(s): Table 1 to Table 2
How it is used: Captions are what a "see Table 2" cross-reference points to (References > Cross-reference).
How to change it: References > Insert Caption adds a new one. If numbers look stale, press Ctrl+A then F9 to update all fields.
Learn this: How to Add a Table of Contents, Captions, and Cross-References in Word →<w:sdtPr>
<w:alias w:val="Organization"/>
<w:tag w:val="organization"/>
<w:text/>
</w:sdtPr>Names, numbers and other details people change every time are plain text content controls. Click one and type: the text replaces the sample, keeps the formatting, and the field still shows its name when selected.
Piece by piece
<w:alias w:val="…"/>- The title shown on the control’s tab when you click it.
<w:tag w:val="…"/>- A machine-readable name, useful for mail merge or code.
<w:text/>- Plain text: one line, one format, so pasted text cannot break the layout.
<w:showingPlcHdr/>- Present when the field shows gray placeholder text instead of a value.
In the sample: Organization = Summit Credit Union
How it is used: 14 in this template: Organization header, Organization, Plan owner, Version, Primary site, Recovery site, DR coordinator, Infra lead, Apps lead, Comms lead, Declared by, Approver IT, Approver CEO, Approver board. Use Developer > Design Mode to see every control at once, or the Selection Pane to jump between them.
How to change it: Developer > Properties changes the title, tag and placeholder. To show the Developer tab: File > Options > Customize Ribbon > Developer.
Learn this: How to Create Fillable Forms with Content Controls in Word →<w:sdtPr>
<w:alias w:val="Approved date"/>
<w:tag w:val="approved_date"/>
<w:date w:fullDate="2026-10-22T00:00:00Z">
<w:dateFormat w:val="MMMM d, yyyy"/>
<w:lid w:val="en-US"/>
<w:storeMappedDataAs w:val="dateTime"/>
<w:calendar w:val="gregorian"/>
</w:date>
</w:sdtPr>Dates are date picker content controls: click the arrow to pick from a calendar, or type a date in any format and Word shows it as "November 2, 2026".
Piece by piece
w:fullDate- The stored date, independent of how it is shown.
<w:dateFormat w:val="MMMM d, yyyy"/>- Display format: full month name, day, four-digit year.
<w:lid w:val="en-US"/>- Language used for month names.
<w:storeMappedDataAs w:val="dateTime"/>- Stores a real date value if the control is mapped to data.
In the sample: Approved date = October 22, 2026
How it is used: 10 in this template: Approved date, Next review, Declared date, Test calltree, Test restore, Test tabletop, Test failover, Signed date. Pick the date from the calendar so every date in the document has the same format.
How to change it: Developer > Properties > Display the date like this, for example d MMMM yyyy or yyyy-MM-dd.
Learn this: How to Create Fillable Forms with Content Controls in Word →<w:sdtPr>
<w:alias w:val="Tier core"/>
<w:tag w:val="tier_core"/>
<w:dropDownList>
<w:listItem w:displayText="Tier 1" w:value="Tier 1"/>
<w:listItem w:displayText="Tier 2" w:value="Tier 2"/>
<w:listItem w:displayText="Tier 3" w:value="Tier 3"/>
<w:listItem w:displayText="Tier 4" w:value="Tier 4"/>
</w:dropDownList>
</w:sdtPr>Fields with a fixed set of answers are dropdown list content controls, so everyone uses the same words (useful when you search or count documents later).
Piece by piece
<w:dropDownList>- A list the reader must pick from (no free typing).
<w:listItem w:displayText="…" w:value="…"/>- One choice: the text shown and the value stored.
In the sample: Tier core = Tier 1 (Tier 1 / Tier 2 / Tier 3 / Tier 4)
How it is used: 13 in this template: Tier core, Tier online, Tier card, Tier ach, Tier email, Tier loan, Tier hr, Tier intranet, Trigger, Result calltree, Result restore, Result tabletop, Result failover. Click the field and choose from the list.
How to change it: Developer > Properties > Add, Modify or Remove choices. Use a Combo Box instead if people need to type their own answer.
Learn this: How to Create Fillable Forms with Content Controls in Word →<w:style w:type="paragraph" w:styleId="Callout">
<w:name w:val="Callout"/>
<w:basedOn w:val="Normal"/>
<w:pPr>
<w:pBdr>
<w:left w:val="single" w:color="F2A93B" w:sz="24" w:space="8"/>
</w:pBdr>
<w:shd w:fill="EEF2F8" w:color="auto" w:val="clear"/>
<w:spacing w:after="160" w:before="120"/>
<w:ind w:left="180" w:right="180"/>
</w:pPr>
<w:rPr>
<w:sz w:val="21"/>
</w:rPr>
</w:style>Notes and warnings use a paragraph style named Callout: tinted background, amber bar on the left, indented on both sides. Because it is a style, every callout matches and you can restyle them all at once.
Piece by piece
<w:shd w:fill="EEF2F8"/>- Light blue-gray background.
<w:left w:val="single" w:sz="24" w:color="F2A93B"/>- Amber bar, 3 pt wide, on the left edge.
<w:ind w:left="180" w:right="180"/>- Indented 1/8 inch on each side.
In the sample: Used for the notes, tips and warnings in the body.
How it is used: Put the cursor in a paragraph and pick Callout in the Styles gallery.
How to change it: Right-click Callout in the Styles gallery > Modify > Format > Border or Shading. All callouts change together.
Learn this: How to Use Styles and the Navigation Pane in Word →<w:trPr>
<w:cantSplit/>
<w:tblHeader/>
</w:trPr>Header rows are marked to repeat at the top of each page when a table breaks, and rows are set not to split across pages, so a long table stays readable when printed.
Piece by piece
<w:tblHeader/>- Repeat this row at the top of each page.
<w:cantSplit/>- Keep each row on one page.
In the sample: 5 of 8 tables repeat their header row
How it is used: Add rows with Tab in the last cell; the header keeps repeating.
How to change it: Click in the header row > Table Layout > Repeat Header Rows. Short tables are also set to keep with the next paragraph so they do not split.
Learn this: How to Build and Format Tables That Read Well in Word →<w:style w:type="paragraph" w:styleId="Guidance">
<w:name w:val="Guidance"/>
<w:basedOn w:val="Normal"/>
<w:pPr>
<w:spacing w:after="100"/>
</w:pPr>
<w:rPr>
<w:i/>
<w:iCs/>
<w:color w:val="6B7280"/>
<w:sz w:val="19"/>
</w:rPr>
</w:style>Instructions for whoever fills in the template use a Guidance style (gray italics). Delete them before you send the document; with a style, Find and Replace can remove them all at once.
Piece by piece
<w:i/>- Italic.
<w:color w:val="6B7280"/>- Gray text.
In the sample: One note under the title block.
How it is used: Home > Replace > More > Format > Style > Guidance finds every note.
How to change it: Right-click Guidance in the Styles gallery > Modify.
Learn this: How to Use Styles and the Navigation Pane in Word →Tips and limits
- Store printed and offline copies. A plan that lives only on the file server is lost in the disaster it is meant for.
- Ransomware changes the rules: replicated data may be encrypted too. Keep at least one backup copy offline or immutable.
- Test the contact tree quarterly; numbers go stale faster than anything else in the plan.
- Record every real activation and test in the incident log and update the plan within a month.
- Regulated firms (banks, credit unions, healthcare) usually have specific testing and board-review requirements; check yours.
Learn the skills behind this template
Was this guide helpful? Spot a mistake? Send feedback · admin@arumsoft.com