Client Case Study and ROI One-Pager Template for Word
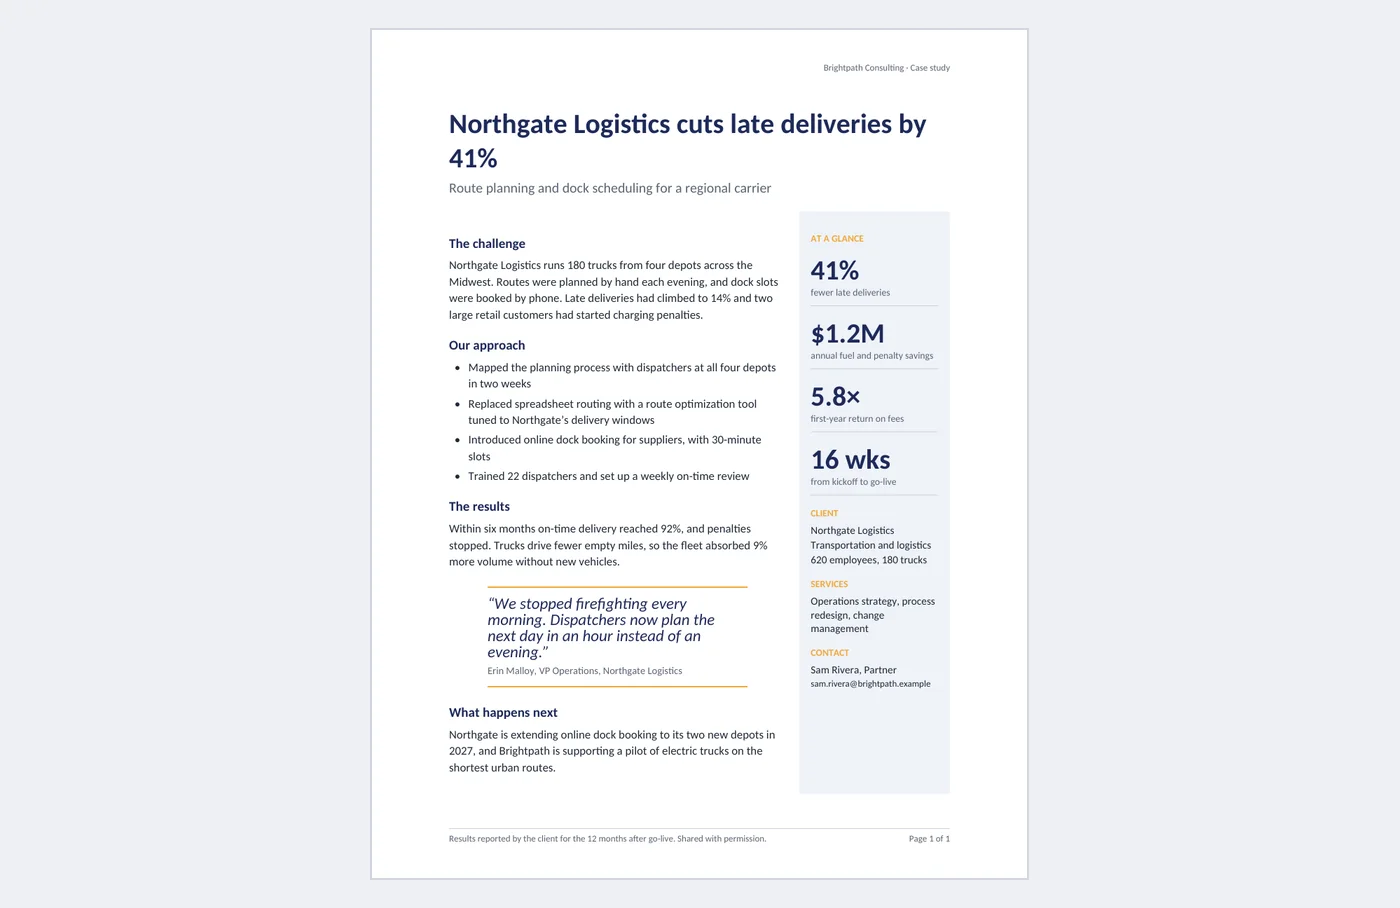
A good case study is read in under a minute: a headline with the result, a short story of what was wrong and what you did, a few numbers that prove it, and a client saying it in their own words. This template is a finished one-page example for a fictional consulting firm and logistics client, laid out as a story column with a shaded sidebar of four metric callouts. The layout is a borderless table, so it stays put in Word, Google Docs and PDF.
- Pages:
- 1
- Works with:
- Word for Microsoft 365, Word 2016 or later, Word for Mac (Word for the web can fill in fields)
- Updated:
Client Case Study One-Pager Template.docx
Free to download. No sign-up needed. No macros.
What you can do with it
- Headline and subtitle as fill-in fields, so the result is the first thing anyone reads
- Challenge, approach and results sections in unnumbered headings, plus a “what happens next” close
- Client quote in a Pull Quote style with amber rules and a source line
- Shaded sidebar with four Metric Value and Metric Label callouts, client facts with an industry dropdown, services and contact
What's inside
The document has 1 pages. Each part below is a heading in the file, so you can jump to it from the Navigation Pane (View > Navigation Pane).
| Part | What it covers | What you write |
|---|---|---|
| Headline and subtitle | The result and the work in one line each | Title and subtitle fields |
| Story column | What was wrong, what was done, what changed | Challenge, approach (bullets), results, what happens next |
| Client quote | Proof in the client’s words | Pull Quote and Pull Quote Source styles |
| Sidebar | The numbers and facts at a glance | Four metrics, client name, industry dropdown, size, services, contact |
Before you start
- Get written permission from the client to publish their name, numbers and quote, and agree who approves the final text.
- Collect before-and-after numbers with the period they cover; the footer says where they came from.
- Pick the four numbers a buyer cares about most: usually an outcome, money, return and speed.
Step-by-step guide
Write the headline
Click the title and type the client and the result in one line, for example “Northgate Logistics cuts late deliveries by 41%”.
Tell the challenge
Two or three sentences with numbers: what was going wrong and what it was costing the client.
List the approach
Three to five bullets of what you actually did, in order, with timeframes.
Show the results and quote
One short paragraph of outcomes, then type the client quote over the sample and the person’s name and title in the source line.
Fill in the sidebar
Type over each big number and its label, pick the industry, and update client size, services and contact.
Check it fits on one page
Export to PDF and make sure nothing spills to a second page. Shorten the story rather than shrinking the text.
Field and control map
Every content control and field in the document, in the order they appear. Gray-boxed fields in Word are the content controls.
| Name | Type | Where | Value in the sample |
|---|---|---|---|
| Firm header | Text | Header | Brightpath Consulting |
| Case study title | Text | Body | Northgate Logistics cuts late deliveries by 41% |
| Case study subtitle | Text | Body | Route planning and dock scheduling for a regional carrier |
| Quote source | Text | Body | Erin Malloy, VP Operations, Northgate Logistics |
| Metric 1 value | Text | Body | 41% |
| Metric 1 label | Text | Body | fewer late deliveries |
| Metric 2 value | Text | Body | $1.2M |
| Metric 2 label | Text | Body | annual fuel and penalty savings |
| Metric 3 value | Text | Body | 5.8× |
| Metric 3 label | Text | Body | first-year return on fees |
| Metric 4 value | Text | Body | 16 wks |
| Metric 4 label | Text | Body | from kickoff to go-live |
| Client name | Text | Body | Northgate Logistics |
| Industry | Dropdown | Body | Transportation and logistics (Transportation and logistics / Manufacturing / Retail / Healthcare / Financial services / Public sector / Other) |
| Client size | Text | Body | 620 employees, 180 trucks |
| Services | Text | Body | Operations strategy, process redesign, change management |
| Contact name | Text | Body | Sam Rivera, Partner |
| Contact email | Text | Body | sam.rivera@brightpath.example |
{ PAGE } | Field | Footer | 1 |
{ NUMPAGES } | Field | Footer | 1 |
Every field, control and style, explained
The code in each card is read straight from the .docx file (the XML Word stores, or the field code you see with Alt+F9), so it is exactly what the template contains.
Page { PAGE } of { NUMPAGES }The footer counts pages with two fields: PAGE is the current page and NUMPAGES is the total. Both recalculate when the document is printed, saved as PDF or scrolled in Print Layout.
Piece by piece
PAGE- The number of the page the field sits on.
NUMPAGES- The total number of pages in the document.
In the sample: Page 1 of 1 on the first page
How it is used: Nothing to do: add or delete pages and the numbers follow.
How to change it: Double-click the footer to edit the text around the fields. Insert > Page Number > Format Page Numbers sets the starting number.
Learn this: How to Set Up Pages in Word: Margins, Breaks, Headers, Footers, and Page Numbers →<w:sdtPr>
<w:alias w:val="Case study title"/>
<w:tag w:val="case_study_title"/>
<w:text/>
</w:sdtPr>Names, numbers and other details people change every time are plain text content controls. Click one and type: the text replaces the sample, keeps the formatting, and the field still shows its name when selected.
Piece by piece
<w:alias w:val="…"/>- The title shown on the control’s tab when you click it.
<w:tag w:val="…"/>- A machine-readable name, useful for mail merge or code.
<w:text/>- Plain text: one line, one format, so pasted text cannot break the layout.
<w:showingPlcHdr/>- Present when the field shows gray placeholder text instead of a value.
In the sample: Case study title = Northgate Logistics cuts late deliveries by 41%
How it is used: 17 in this template: Firm header, Case study title, Case study subtitle, Quote source, Metric 1 value, Metric 1 label, Metric 2 value, Metric 2 label, Metric 3 value, Metric 3 label, Metric 4 value, Metric 4 label, Client name, Client size, Services, Contact name, Contact email. Use Developer > Design Mode to see every control at once, or the Selection Pane to jump between them.
How to change it: Developer > Properties changes the title, tag and placeholder. To show the Developer tab: File > Options > Customize Ribbon > Developer.
Learn this: How to Create Fillable Forms with Content Controls in Word →<w:sdtPr>
<w:alias w:val="Industry"/>
<w:tag w:val="industry"/>
<w:dropDownList>
<w:listItem w:displayText="Transportation and logistics" w:value="Transportation and logistics"/>
<w:listItem w:displayText="Manufacturing" w:value="Manufacturing"/>
<w:listItem w:displayText="Retail" w:value="Retail"/>
<w:listItem w:displayText="Healthcare" w:value="Healthcare"/>
<w:listItem w:displayText="Financial services" w:value="Financial services"/>
<w:listItem w:displayText="Public sector" w:value="Public sector"/>
<w:listItem w:displayText="Other" w:value="Other"/>
</w:dropDownList>
</w:sdtPr>Fields with a fixed set of answers are dropdown list content controls, so everyone uses the same words (useful when you search or count documents later).
Piece by piece
<w:dropDownList>- A list the reader must pick from (no free typing).
<w:listItem w:displayText="…" w:value="…"/>- One choice: the text shown and the value stored.
In the sample: Industry = Transportation and logistics (Transportation and logistics / Manufacturing / Retail / Healthcare / Financial services / Public sector / Other)
How it is used: 1 in this template: Industry. Click the field and choose from the list.
How to change it: Developer > Properties > Add, Modify or Remove choices. Use a Combo Box instead if people need to type their own answer.
Learn this: How to Create Fillable Forms with Content Controls in Word →<w:style w:type="paragraph" w:styleId="PullQuote">
<w:name w:val="Pull Quote"/>
<w:basedOn w:val="Normal"/>
<w:next w:val="Normal"/>
<w:pPr>
<w:keepNext/>
<w:pBdr>
<w:top w:val="single" w:color="F2A93B" w:sz="12" w:space="8"/>
</w:pBdr>
<w:spacing w:after="80" w:before="280" w:line="300"/>
<w:ind w:left="720" w:right="720"/>
</w:pPr>
<w:rPr>
<w:i/>
<w:iCs/>
<w:color w:val="1E2A5A"/>
<w:sz w:val="30"/>
</w:rPr>
</w:style>Key sentences are repeated as pull quotes in a Pull Quote paragraph style: larger italic navy text between two amber rules. Readers who skim catch the argument; because it is a style, every quote matches.
Piece by piece
<w:i/>- Italic.
<w:sz w:val="30"/>- 15 pt (Word stores half-points).
<w:top w:val="single" w:sz="12" w:color="F2A93B"/>- Amber rule above; the source line carries the rule below.
<w:ind w:left="720" w:right="720"/>- Indented half an inch on both sides.
In the sample: Two pull quotes in the body, each with a source line.
How it is used: Type the quote, pick Pull Quote; put the source on the next line with Pull Quote Source.
How to change it: Right-click Pull Quote in the Styles gallery > Modify.
Learn this: How to Use Styles and the Navigation Pane in Word →<w:style w:type="paragraph" w:styleId="MetricValue">
<w:name w:val="Metric Value"/>
<w:basedOn w:val="Normal"/>
<w:next w:val="Normal"/>
<w:pPr>
<w:keepNext/>
<w:spacing w:after="0" w:before="120" w:line="240" w:lineRule="auto"/>
</w:pPr>
<w:rPr>
<w:b/>
<w:color w:val="1E2A5A"/>
<w:sz w:val="52"/>
</w:rPr>
</w:style>The page is a borderless two-column table: the story on the left and a shaded sidebar on the right. Big numbers use a Metric Value style and their labels a Metric Label style, so they line up and can be restyled together. A table keeps the sidebar next to the text in Word, Google Docs and PDF exports, which text boxes do not always do.
Piece by piece
<w:tblBorders> none- No visible borders, so it reads as a page layout, not a table.
<w:shd w:fill="EEF2F8"/>- Shaded sidebar cell.
Metric Value- 26 pt bold navy number, kept with its label.
Metric Label- Small gray label with a thin rule under it.
In the sample: Four metrics in the sidebar, each a Metric Value and a Metric Label paragraph.
How it is used: Click in the sidebar and type over a number or label. Show gridlines (Table Layout > View Gridlines) to see the columns while editing.
How to change it: Drag the column border to change widths, or change the sidebar shading under Table Design > Shading.
Learn this: How to Build and Format Tables That Read Well in Word →Tips and limits
- Lead with the result, not the client’s history. Most readers only see the headline and the sidebar.
- Use numbers the client reported and say so; estimated savings weaken the whole page.
- Keep the quote about the outcome, not about your team being nice to work with.
- If a client will not be named, describe them (“a regional carrier with 180 trucks”) and keep the numbers.
- Make a copy of the file for each case study so the styles stay consistent across your library.
Learn the skills behind this template
Was this guide helpful? Spot a mistake? Send feedback · admin@arumsoft.com