Grant Proposal Letter of Inquiry (LOI) Template for Word
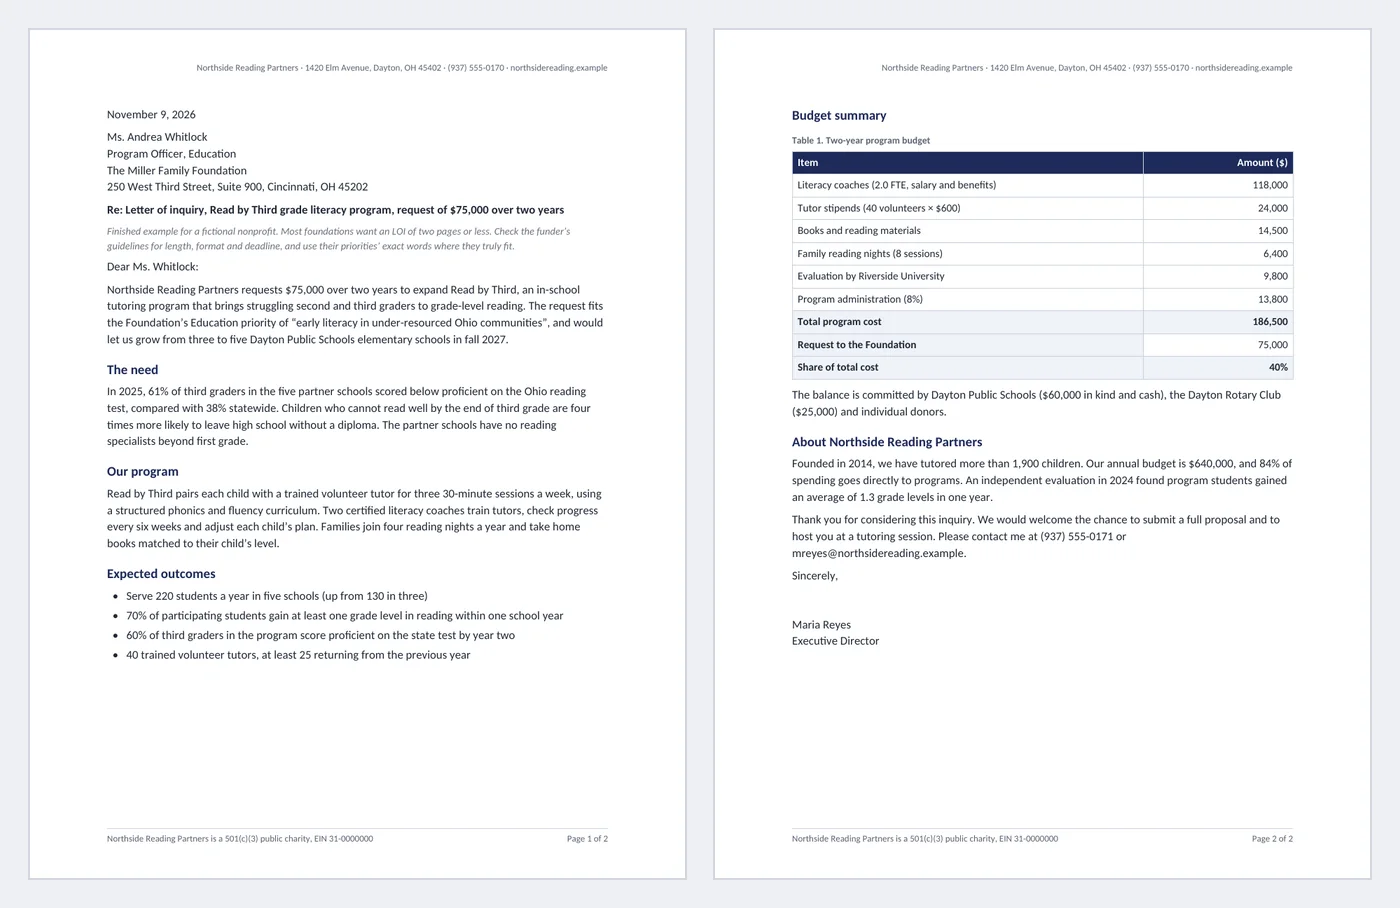
Many foundations ask for a short letter of inquiry before they invite a full proposal. In two pages it has to say what you are asking for, why it matters, what will change, what it costs and why your organization can deliver. This template is a finished two-page example for a fictional literacy nonprofit writing to a family foundation. The budget table adds itself up with Word formula fields, so the total and the share requested stay right when you change a line.
- Pages:
- 2
- Works with:
- Word for Microsoft 365, Word 2016 or later, Word for Mac (Word for the web can fill in fields)
- Updated:
Grant Letter of Inquiry Template.docx
Free to download. No sign-up needed. No macros.
What you can do with it
- Letterhead in the page header and an IRS status line in the footer, so every page carries them
- Date picker, funder name, title and address fields, and a bold Re line with program, amount and a grant period dropdown
- Need, program, outcomes, budget and background sections in unnumbered headings, the order most funders expect
- Budget summary table with { =SUM(ABOVE) } for the total and a formula for the share requested
What's inside
The document has 2 pages. Each part below is a heading in the file, so you can jump to it from the Navigation Pane (View > Navigation Pane).
| Part | What it covers | What you write |
|---|---|---|
| Letter opening | Who it is to and what you ask for | Date, funder address, Re line with program, amount and period, salutation, one-paragraph request |
| The need | Why the work matters now | Local numbers compared with a benchmark |
| Program and outcomes | What you will do and what will change | How the program works; four measurable outcomes |
| Budget summary | What it costs and who else pays | Line items, formula total, request and share, other funders |
| Background and close | Why you can deliver | Track record, budget size, contact details, signature |
Before you start
- Read the funder’s guidelines: page limit, format, deadline, and whether they accept unsolicited letters at all.
- Check that your program really fits one of their stated priorities; quote the priority in the opening paragraph only if it does.
- Have your program budget and other committed funding ready; the budget table needs them.
Step-by-step guide
Fill in the opening
Pick the date, type the program officer’s name, title and foundation address, and complete the Re line with program, amount and grant period.
State the request first
One paragraph: who you are, how much, for what, over how long, and which funder priority it matches.
Show the need with numbers
Use two or three local figures and compare them with a state or national benchmark.
Describe the program and outcomes
Say how the program works in plain words, then list outcomes someone could measure a year from now.
Update the budget
Type over the line items and amounts, then select the table and press F9 so the total and share recalculate.
Close and sign
Add your track record, invite the next step, and sign with the executive director’s name and title.
Field and control map
Every content control and field in the document, in the order they appear. Gray-boxed fields in Word are the content controls.
| Name | Type | Where | Value in the sample |
|---|---|---|---|
| Organization header | Text | Header | Northside Reading Partners |
| Letter date | Date picker | Body | November 9, 2026 |
| Recipient name | Text | Body | Ms. Andrea Whitlock |
| Recipient title | Text | Body | Program Officer, Education |
| Foundation | Text | Body | The Miller Family Foundation |
| Foundation address | Text | Body | 250 West Third Street, Suite 900, Cincinnati, OH 45202 |
| Program name | Text | Body | Read by Third grade literacy program |
| Amount requested | Text | Body | $75,000 |
| Grant period | Dropdown | Body | two years (one year / two years / three years) |
| Salutation | Text | Body | Ms. Whitlock |
| Contact email | Text | Body | mreyes@northsidereading.example |
| Signer name | Text | Body | Maria Reyes |
| Signer title | Text | Body | Executive Director |
{ PAGE } | Field | Footer | 1 |
{ NUMPAGES } | Field | Footer | 2 |
{ =SUM(ABOVE) \# "#,##0" } … | Field | Body | 2 table formulas: 186,500, 40% … |
{ SEQ Table \* ARABIC } | Field | Body | 1 |
Every field, control and style, explained
The code in each card is read straight from the .docx file (the XML Word stores, or the field code you see with Alt+F9), so it is exactly what the template contains.
Page { PAGE } of { NUMPAGES }The footer counts pages with two fields: PAGE is the current page and NUMPAGES is the total. Both recalculate when the document is printed, saved as PDF or scrolled in Print Layout.
Piece by piece
PAGE- The number of the page the field sits on.
NUMPAGES- The total number of pages in the document.
In the sample: Page 1 of 2 on the first page
How it is used: Nothing to do: add or delete pages and the numbers follow.
How to change it: Double-click the footer to edit the text around the fields. Insert > Page Number > Format Page Numbers sets the starting number.
Learn this: How to Set Up Pages in Word: Margins, Breaks, Headers, Footers, and Page Numbers →{ SEQ Table \* ARABIC }Each table caption uses a SEQ field that counts tables in order. Insert a new captioned table in the middle and every later caption renumbers.
Piece by piece
SEQ Table- A counter named "Table". Every SEQ Table field adds 1.
\* ARABIC- Show the counter as 1, 2, 3.
In the sample: 1 caption(s): Table 1
How it is used: Captions are what a "see Table 2" cross-reference points to (References > Cross-reference).
How to change it: References > Insert Caption adds a new one. If numbers look stale, press Ctrl+A then F9 to update all fields.
Learn this: How to Add a Table of Contents, Captions, and Cross-References in Word →{ =SUM(ABOVE) \# "#,##0" }
{ =B9/B8*100 \# "0%" }Some cells are Word formula fields, not typed numbers. Word tables address cells like a spreadsheet: columns A, B, C from the left and rows 1, 2, 3 from the top. A field such as { =B2*C2 } multiplies two cells, and { =SUM(ABOVE) } adds every number above it in the column.
Piece by piece
=B2*C2- Multiply the cells in column B and column C of row 2.
=SUM(ABOVE)- Add the numbers above, up to the first empty or text cell.
\# "#,##0.00"- Number format: thousands separator and two decimals.
In the sample: 2 formula fields. Last result: 40%
How it is used: Type the new counts, then select the whole table and press F9 to recalculate. Word does not recalculate table formulas on its own the way Excel does. To refresh them on every print, turn on File > Options > Display > Update fields before printing.
How to change it: Right-click a result > Edit Field > Formula to change the formula or number format. Press Alt+F9 to show every field code at once.
Learn this: How to Use Mail Merge and Fields for Letters, Labels, and Certificates in Word →<w:sdtPr>
<w:alias w:val="Recipient name"/>
<w:tag w:val="recipient_name"/>
<w:text/>
</w:sdtPr>Names, numbers and other details people change every time are plain text content controls. Click one and type: the text replaces the sample, keeps the formatting, and the field still shows its name when selected.
Piece by piece
<w:alias w:val="…"/>- The title shown on the control’s tab when you click it.
<w:tag w:val="…"/>- A machine-readable name, useful for mail merge or code.
<w:text/>- Plain text: one line, one format, so pasted text cannot break the layout.
<w:showingPlcHdr/>- Present when the field shows gray placeholder text instead of a value.
In the sample: Recipient name = Ms. Andrea Whitlock
How it is used: 11 in this template: Organization header, Recipient name, Recipient title, Foundation, Foundation address, Program name, Amount requested, Salutation, Contact email, Signer name, Signer title. Use Developer > Design Mode to see every control at once, or the Selection Pane to jump between them.
How to change it: Developer > Properties changes the title, tag and placeholder. To show the Developer tab: File > Options > Customize Ribbon > Developer.
Learn this: How to Create Fillable Forms with Content Controls in Word →<w:sdtPr>
<w:alias w:val="Letter date"/>
<w:tag w:val="letter_date"/>
<w:date w:fullDate="2026-11-09T00:00:00Z">
<w:dateFormat w:val="MMMM d, yyyy"/>
<w:lid w:val="en-US"/>
<w:storeMappedDataAs w:val="dateTime"/>
<w:calendar w:val="gregorian"/>
</w:date>
</w:sdtPr>Dates are date picker content controls: click the arrow to pick from a calendar, or type a date in any format and Word shows it as "November 2, 2026".
Piece by piece
w:fullDate- The stored date, independent of how it is shown.
<w:dateFormat w:val="MMMM d, yyyy"/>- Display format: full month name, day, four-digit year.
<w:lid w:val="en-US"/>- Language used for month names.
<w:storeMappedDataAs w:val="dateTime"/>- Stores a real date value if the control is mapped to data.
In the sample: Letter date = November 9, 2026
How it is used: 1 in this template: Letter date. Pick the date from the calendar so every date in the document has the same format.
How to change it: Developer > Properties > Display the date like this, for example d MMMM yyyy or yyyy-MM-dd.
Learn this: How to Create Fillable Forms with Content Controls in Word →<w:sdtPr>
<w:alias w:val="Grant period"/>
<w:tag w:val="grant_period"/>
<w:dropDownList>
<w:listItem w:displayText="one year" w:value="one year"/>
<w:listItem w:displayText="two years" w:value="two years"/>
<w:listItem w:displayText="three years" w:value="three years"/>
</w:dropDownList>
</w:sdtPr>Fields with a fixed set of answers are dropdown list content controls, so everyone uses the same words (useful when you search or count documents later).
Piece by piece
<w:dropDownList>- A list the reader must pick from (no free typing).
<w:listItem w:displayText="…" w:value="…"/>- One choice: the text shown and the value stored.
In the sample: Grant period = two years (one year / two years / three years)
How it is used: 1 in this template: Grant period. Click the field and choose from the list.
How to change it: Developer > Properties > Add, Modify or Remove choices. Use a Combo Box instead if people need to type their own answer.
Learn this: How to Create Fillable Forms with Content Controls in Word →<w:trPr>
<w:cantSplit/>
<w:tblHeader/>
</w:trPr>Header rows are marked to repeat at the top of each page when a table breaks, and rows are set not to split across pages, so a long table stays readable when printed.
Piece by piece
<w:tblHeader/>- Repeat this row at the top of each page.
<w:cantSplit/>- Keep each row on one page.
In the sample: 1 of 1 tables repeat their header row
How it is used: Add rows with Tab in the last cell; the header keeps repeating.
How to change it: Click in the header row > Table Layout > Repeat Header Rows. Short tables are also set to keep with the next paragraph so they do not split.
Learn this: How to Build and Format Tables That Read Well in Word →<w:style w:type="paragraph" w:styleId="Guidance">
<w:name w:val="Guidance"/>
<w:basedOn w:val="Normal"/>
<w:pPr>
<w:spacing w:after="100"/>
</w:pPr>
<w:rPr>
<w:i/>
<w:iCs/>
<w:color w:val="6B7280"/>
<w:sz w:val="19"/>
</w:rPr>
</w:style>Instructions for whoever fills in the template use a Guidance style (gray italics). Delete them before you send the document; with a style, Find and Replace can remove them all at once.
Piece by piece
<w:i/>- Italic.
<w:color w:val="6B7280"/>- Gray text.
In the sample: One note under the title block.
How it is used: Home > Replace > More > Format > Style > Guidance finds every note.
How to change it: Right-click Guidance in the Styles gallery > Modify.
Learn this: How to Use Styles and the Navigation Pane in Word →Tips and limits
- Keep it to two pages. If the funder gives a word limit, it overrides everything else.
- Lead with the request. A program officer reading 40 letters should know what you want from the first paragraph.
- Outcomes are changes in people, not activities: “70% gain a grade level”, not “we will hold 300 sessions”.
- Name other funders and in-kind support. Foundations rarely want to be the only source.
- Word table formulas do not update by themselves: press F9 on the table before you save as PDF.
Learn the skills behind this template
Was this guide helpful? Spot a mistake? Send feedback · admin@arumsoft.com