Company Vehicle Policy and Driver Acknowledgment Form for Word
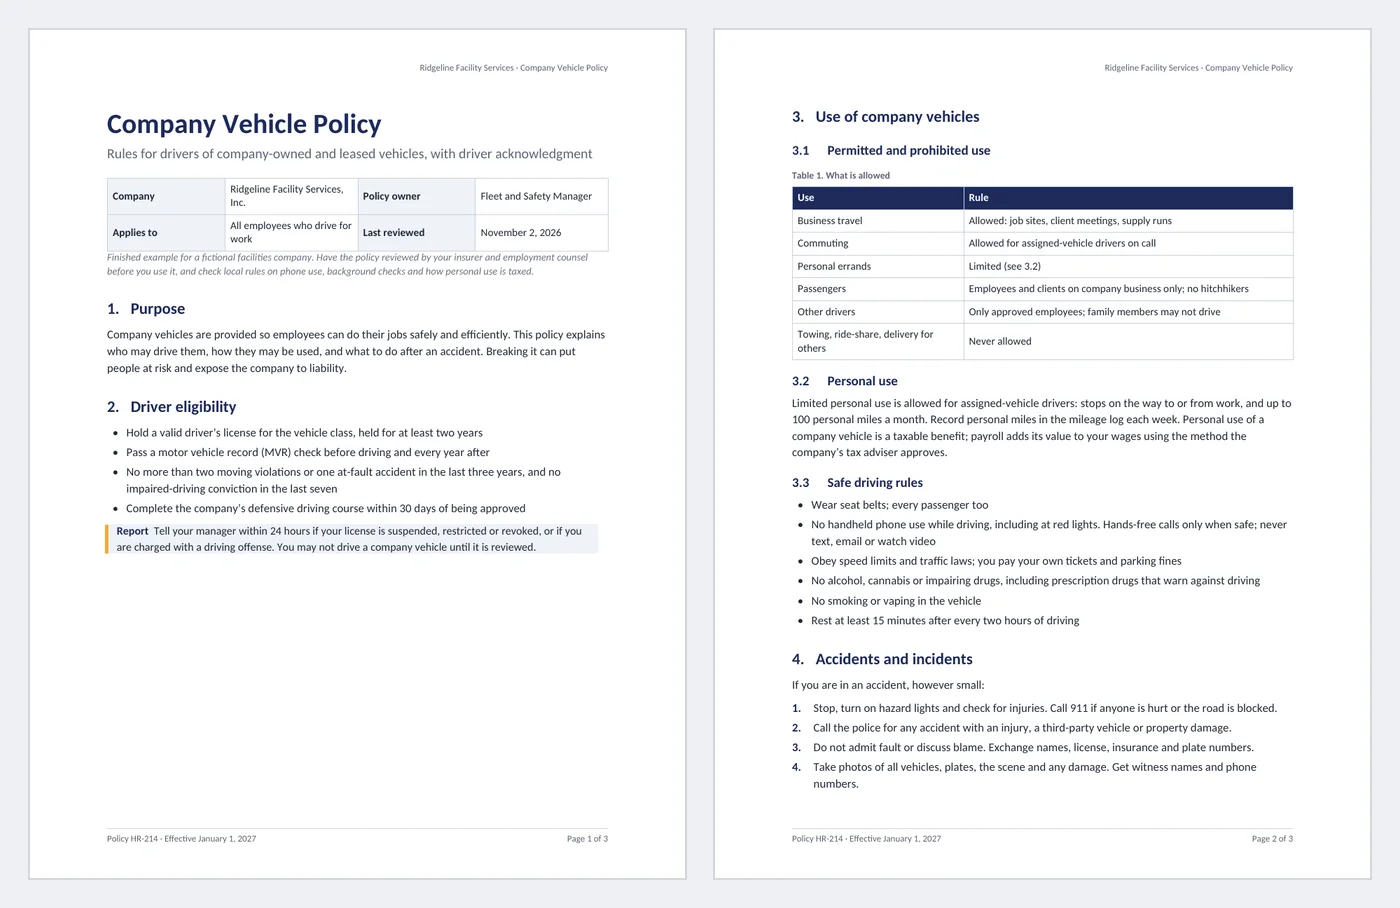
A vehicle policy protects people first and the company second: who is allowed to drive, what the car may be used for, what a driver must never do, and exactly what to do after a crash. It only works if each driver has read it and signed. This template is a finished three-page example for a fictional facilities company, with the choices that differ between companies (commuting, personal use, personal miles) as dropdowns and fields, and an acknowledgment page that records the driver, vehicle and license.
- Pages:
- 3
- Works with:
- Word for Microsoft 365, Word 2016 or later, Word for Mac (Word for the web can fill in fields)
- Updated:
Company Vehicle Policy Template.docx
Free to download. No sign-up needed. No macros.
What you can do with it
- Policy block with an “applies to” dropdown, review date picker, and policy number and effective date in the footer
- Permitted-use table with dropdowns for the commuting and personal-use rules, plus a personal-miles field
- Driver eligibility rules, safe driving rules and seven numbered steps for what to do after an accident
- Driver acknowledgment: four checkbox statements, employee, vehicle and license details, and two signatures
What's inside
The document has 3 pages. Each part below is a heading in the file, so you can jump to it from the Navigation Pane (View > Navigation Pane).
| Part | What it covers | What you write |
|---|---|---|
| Policy block | Which policy and who it covers | Company, owner, scope dropdown, review date |
| 1–2. Purpose and eligibility | Who may drive | License, record check, violation limits, training, reporting duty |
| 3. Use of vehicles | What the vehicle may be used for | Permitted-use table, personal miles and tax, safe driving rules |
| 4. Accidents | What to do after a crash | Seven numbered steps |
| 5–6. Care and violations | Upkeep and consequences | Fuel card, weekly checks, service, discipline |
| 7. Acknowledgment | Proof each driver agreed | Four checkboxes, vehicle and license details, signatures |
Before you start
- Decide the company’s rules on commuting, personal use and personal miles; they are dropdowns and fields in the policy.
- Ask your insurer what driver standards it requires (license history, violations, age) and use those numbers.
- Check local law on phone use while driving, background and record checks, and how personal use of a company car is taxed.
Step-by-step guide
Fill in the policy block
Type the company and policy owner, pick who the policy applies to and the review date, and set the policy number and effective date in the footer.
Set eligibility rules
Edit the license, record and training rules to match your insurer’s requirements.
Choose the use rules
Pick the commuting and personal-use rules from the dropdowns and enter the monthly personal-mile allowance.
Check the accident steps
Put your real fleet phone line in step 5 and make sure the accident form really is in every glove box.
Collect acknowledgments
For each driver, save a copy, enter their name, ID, vehicle, plate and license details, tick the statements and sign.
Review every year
Update the review date, re-run record checks, and have drivers sign again when the policy changes.
Field and control map
Every content control and field in the document, in the order they appear. Gray-boxed fields in Word are the content controls.
| Name | Type | Where | Value in the sample |
|---|---|---|---|
| Company header | Text | Header | Ridgeline Facility Services |
| Company | Text | Body | Ridgeline Facility Services, Inc. |
| Policy owner | Text | Body | Fleet and Safety Manager |
| Applies to | Dropdown | Body | All employees who drive for work (Assigned-vehicle drivers only / All employees who drive for work / Pool vehicle users only) |
| Last reviewed | Date picker | Body | November 2, 2026 |
| Commuting rule | Dropdown | Body | Allowed for assigned-vehicle drivers on call (Not allowed / Allowed for assigned-vehicle drivers on call / Allowed for all assigned vehicles) |
| Personal use rule | Dropdown | Body | Limited (see 3.2) (Not allowed / Limited (see 3.2) / Allowed) |
| Personal miles | Text | Body | 100 |
| Ack read | Checkbox | Body | checked |
| Ack license | Checkbox | Body | checked |
| Ack report | Checkbox | Body | checked |
| Ack personal | Checkbox | Body | checked |
| Employee name | Text | Body | Marcus Bell |
| Employee ID | Text | Body | RF-10482 |
| Vehicle | Text | Body | 2025 Ford Transit 250, unit 37 |
| Plate | Text | Body | OH JKR-4471 |
| License last 4 | Text | Body | 8821 |
| License expiry | Date picker | Body | March 14, 2029 |
| Sig employee | Text | Body | Marcus Bell |
| Signed date | Date picker | Body | 2 fields: Click or tap to enter a date. |
| Sig manager | Text | Body | Rebecca Lin |
| Policy number | Text | Footer | HR-214 |
| Effective date | Date picker | Footer | January 1, 2027 |
{ PAGE } | Field | Footer | 1 |
{ NUMPAGES } | Field | Footer | 3 |
{ SEQ Table \* ARABIC } | Field | Body | 1 |
Every field, control and style, explained
The code in each card is read straight from the .docx file (the XML Word stores, or the field code you see with Alt+F9), so it is exactly what the template contains.
<w:lvl w:ilvl="0">
  <w:start w:val="1"/>
  <w:numFmt w:val="decimal"/>
  <w:pStyle w:val="Heading1"/>
  <w:lvlText w:val="%1."/>
  <w:lvlJc w:val="left"/>
  <w:pPr>
    <w:ind w:left="440" w:hanging="440"/>
  </w:pPr>
</w:lvl>
<w:lvl w:ilvl="1">
  <w:start w:val="1"/>
  <w:numFmt w:val="decimal"/>
  <w:pStyle w:val="Heading2"/>
  <w:lvlText w:val="%1.%2"/>
  <w:lvlJc w:val="left"/>
  <w:pPr>
    <w:ind w:left="660" w:hanging="660"/>
  </w:pPr>
</w:lvl>
The section numbers (1., 2., 6.1 …) are not typed. A multilevel list is linked to the Heading 1 and Heading 2 styles, so any paragraph you set to Heading 1 gets the next number and the table of contents picks it up.
Piece by piece
<w:pStyle w:val="Heading1"/>- Links list level 1 to the Heading 1 style (level 2 to Heading 2).
<w:lvlText w:val="%1."/>- Level 1 shows its counter and a period: 1., 2., 3.
<w:lvlText w:val="%1.%2"/>- Level 2 shows the parent number, a period and its own counter: 6.1, 6.2.
<w:ind w:left="440" w:hanging="440"/>- Hanging indent so wrapped heading text lines up after the number.
In the sample: 1. Purpose, 2. Driver eligibility, 3. Use of company vehicles … (10 headings)
How it is used: To add a section, type the heading, then pick Heading 1 (Ctrl+Alt+1) or Heading 2 (Ctrl+Alt+2) on the Home tab. Numbers after it update by themselves.
How to change it: Home > Multilevel List > Define New Multilevel List to change the format (for example "Section 1"). Keep "Link level to style" set to Heading 1 and Heading 2.
Learn this: How to Plan and Structure Long Documents in Word: Outline View and Multilevel Numbering →Page { PAGE } of { NUMPAGES }The footer counts pages with two fields: PAGE is the current page and NUMPAGES is the total. Both recalculate when the document is printed, saved as PDF or scrolled in Print Layout.
Piece by piece
PAGE- The number of the page the field sits on.
NUMPAGES- The total number of pages in the document.
In the sample: Page 1 of 3 on the first page
How it is used: Nothing to do: add or delete pages and the numbers follow.
How to change it: Double-click the footer to edit the text around the fields. Insert > Page Number > Format Page Numbers sets the starting number.
Learn this: How to Set Up Pages in Word: Margins, Breaks, Headers, Footers, and Page Numbers →{ SEQ Table \* ARABIC }Each table caption uses a SEQ field that counts tables in order. Insert a new captioned table in the middle and every later caption renumbers.
Piece by piece
SEQ Table- A counter named "Table". Every SEQ Table field adds 1.
\* ARABIC- Show the counter as 1, 2, 3.
In the sample: 1 caption(s): Table 1
How it is used: Captions are what a "see Table 2" cross-reference points to (References > Cross-reference).
How to change it: References > Insert Caption adds a new one. If numbers look stale, press Ctrl+A then F9 to update all fields.
Learn this: How to Add a Table of Contents, Captions, and Cross-References in Word →<w:sdtPr>
<w:alias w:val="Company"/>
<w:tag w:val="company"/>
<w:text/>
</w:sdtPr>Names, numbers and other details people change every time are plain text content controls. Click one and type: the text replaces the sample, keeps the formatting, and the field still shows its name when selected.
Piece by piece
<w:alias w:val="…"/>- The title shown on the control’s tab when you click it.
<w:tag w:val="…"/>- A machine-readable name, useful for mail merge or code.
<w:text/>- Plain text: one line, one format, so pasted text cannot break the layout.
<w:showingPlcHdr/>- Present when the field shows gray placeholder text instead of a value.
In the sample: Company = Ridgeline Facility Services, Inc.
How it is used: 12 in this template: Company header, Company, Policy owner, Personal miles, Employee name, Employee ID, Vehicle, Plate, License last 4, Sig employee, Sig manager, Policy number. Use Developer > Design Mode to see every control at once, or the Selection Pane to jump between them.
How to change it: Developer > Properties changes the title, tag and placeholder. To show the Developer tab: File > Options > Customize Ribbon > Developer.
Learn this: How to Create Fillable Forms with Content Controls in Word →<w:sdtPr>
<w:alias w:val="Last reviewed"/>
<w:tag w:val="last_reviewed"/>
<w:date w:fullDate="2026-11-02T00:00:00Z">
<w:dateFormat w:val="MMMM d, yyyy"/>
<w:lid w:val="en-US"/>
<w:storeMappedDataAs w:val="dateTime"/>
<w:calendar w:val="gregorian"/>
</w:date>
</w:sdtPr>Dates are date picker content controls: click the arrow to pick from a calendar, or type a date in any format and Word shows it as "November 2, 2026".
Piece by piece
w:fullDate- The stored date, independent of how it is shown.
<w:dateFormat w:val="MMMM d, yyyy"/>- Display format: full month name, day, four-digit year.
<w:lid w:val="en-US"/>- Language used for month names.
<w:storeMappedDataAs w:val="dateTime"/>- Stores a real date value if the control is mapped to data.
In the sample: Last reviewed = November 2, 2026
How it is used: 5 in this template: Last reviewed, License expiry, Signed date, Effective date. Pick the date from the calendar so every date in the document has the same format.
How to change it: Developer > Properties > Display the date like this, for example d MMMM yyyy or yyyy-MM-dd.
Learn this: How to Create Fillable Forms with Content Controls in Word →<w:sdtPr>
<w:alias w:val="Applies to"/>
<w:tag w:val="applies_to"/>
<w:dropDownList>
<w:listItem w:displayText="Assigned-vehicle drivers only" w:value="Assigned-vehicle drivers only"/>
<w:listItem w:displayText="All employees who drive for work" w:value="All employees who drive for work"/>
<w:listItem w:displayText="Pool vehicle users only" w:value="Pool vehicle users only"/>
</w:dropDownList>
</w:sdtPr>Fields with a fixed set of answers are dropdown list content controls, so everyone uses the same words (useful when you search or count documents later).
Piece by piece
<w:dropDownList>- A list the reader must pick from (no free typing).
<w:listItem w:displayText="…" w:value="…"/>- One choice: the text shown and the value stored.
In the sample: Applies to = All employees who drive for work (Assigned-vehicle drivers only / All employees who drive for work / Pool vehicle users only)
How it is used: 3 in this template: Applies to, Commuting rule, Personal use rule. Click the field and choose from the list.
How to change it: Developer > Properties > Add, Modify or Remove choices. Use a Combo Box instead if people need to type their own answer.
Learn this: How to Create Fillable Forms with Content Controls in Word →<w:sdtPr>
<w:alias w:val="Ack read"/>
<w:tag w:val="ack_read"/>
<w14:checkbox>
<w14:checked w14:val="1"/>
<w14:checkedState w14:val="2612" w14:font="MS Gothic"/>
<w14:uncheckedState w14:val="2610" w14:font="MS Gothic"/>
</w14:checkbox>
</w:sdtPr>Checklist boxes are checkbox content controls: click to tick or untick. They print as ☒ and ☐.
Piece by piece
<w14:checked w14:val="…"/>- 1 when ticked, 0 when not.
<w14:checkedState w14:val="2612"/>- Symbol for ticked: U+2612 ☒.
<w14:uncheckedState w14:val="2610"/>- Symbol for unticked: U+2610 ☐.
In the sample: 4 of 4 ticked in the sample
How it is used: 4 in this template: Ack read, Ack license, Ack report, Ack personal. Click the box. Checkboxes need Word 2010 or later; very old versions show a static symbol.
How to change it: Developer > Properties > Checked symbol > Change, for example to ✓ (Wingdings 2).
Learn this: How to Create Fillable Forms with Content Controls in Word →<w:style w:type="paragraph" w:styleId="Callout">
<w:name w:val="Callout"/>
<w:basedOn w:val="Normal"/>
<w:pPr>
<w:pBdr>
<w:left w:val="single" w:color="F2A93B" w:sz="24" w:space="8"/>
</w:pBdr>
<w:shd w:fill="EEF2F8" w:color="auto" w:val="clear"/>
<w:spacing w:after="160" w:before="120"/>
<w:ind w:left="180" w:right="180"/>
</w:pPr>
<w:rPr>
<w:sz w:val="21"/>
</w:rPr>
</w:style>Notes and warnings use a paragraph style named Callout: tinted background, amber bar on the left, indented on both sides. Because it is a style, every callout matches and you can restyle them all at once.
Piece by piece
<w:shd w:fill="EEF2F8"/>- Light blue-gray background.
<w:left w:val="single" w:sz="24" w:color="F2A93B"/>- Amber bar, 3 pt wide, on the left edge.
<w:ind w:left="180" w:right="180"/>- Indented 1/8 inch on each side.
In the sample: Used for the notes, tips and warnings in the body.
How it is used: Put the cursor in a paragraph and pick Callout in the Styles gallery.
How to change it: Right-click Callout in the Styles gallery > Modify > Format > Border or Shading. All callouts change together.
Learn this: How to Use Styles and the Navigation Pane in Word →<w:trPr>
<w:cantSplit/>
<w:tblHeader/>
</w:trPr>Header rows are marked to repeat at the top of each page when a table breaks, and rows are set not to split across pages, so a long table stays readable when printed.
Piece by piece
<w:tblHeader/>- Repeat this row at the top of each page.
<w:cantSplit/>- Keep each row on one page.
In the sample: 1 of 6 tables repeat their header row
How it is used: Add rows with Tab in the last cell; the header keeps repeating.
How to change it: Click in the header row > Table Layout > Repeat Header Rows. Short tables are also set to keep with the next paragraph so they do not split.
Learn this: How to Build and Format Tables That Read Well in Word →<w:style w:type="paragraph" w:styleId="Guidance">
<w:name w:val="Guidance"/>
<w:basedOn w:val="Normal"/>
<w:pPr>
<w:spacing w:after="100"/>
</w:pPr>
<w:rPr>
<w:i/>
<w:iCs/>
<w:color w:val="6B7280"/>
<w:sz w:val="19"/>
</w:rPr>
</w:style>Instructions for whoever fills in the template use a Guidance style (gray italics). Delete them before you send the document; with a style, Find and Replace can remove them all at once.
Piece by piece
<w:i/>- Italic.
<w:color w:val="6B7280"/>- Gray text.
In the sample: One note under the title block.
How it is used: Home > Replace > More > Format > Style > Guidance finds every note.
How to change it: Right-click Guidance in the Styles gallery > Modify.
Learn this: How to Use Styles and the Navigation Pane in Word →Tips and limits
- Store only the last four digits of a license number in the form; keep full numbers in your HR system.
- Personal use of a company car is usually a taxable benefit. Ask your payroll or tax adviser which valuation method to use.
- Keep the accident steps short enough to follow at the roadside; print them on a card for the glove box.
- Apply the policy the same way to every driver, including managers.
- This template is not legal advice. Have it reviewed for the places you operate.
Learn the skills behind this template
Was this guide helpful? Spot a mistake? Send feedback · admin@arumsoft.com