Software Requirements Specification (SRS) Template for Word
A requirements specification is the contract between the people who want software and the people who build and test it. Each requirement needs to be one testable statement with an ID, a priority and a way to prove it was met. This template is a finished seven-page example for a fictional ferry booking app, laid out the way ISO/IEC/IEEE 29148 (the successor to IEEE 830) recommends: introduction, overall description, functional requirements grouped by feature, quality targets, interfaces and a traceability matrix.
- Pages:
- 7
- Works with:
- Word for Microsoft 365, Word 2016 or later, Word for Mac (Word for the web can fill in fields)
- Updated:
Software Requirements Specification Template.docx
Free to download. No sign-up needed. No macros.
What you can do with it
- Document control block with a status dropdown, document date picker and revision history table
- Three heading levels numbered automatically (3.1.2) and a table of contents that lists all three
- Requirement tables with a MoSCoW priority dropdown and a verification method dropdown on every row
- Non-functional targets, external interfaces, a traceability matrix with coverage status and four approval signatures
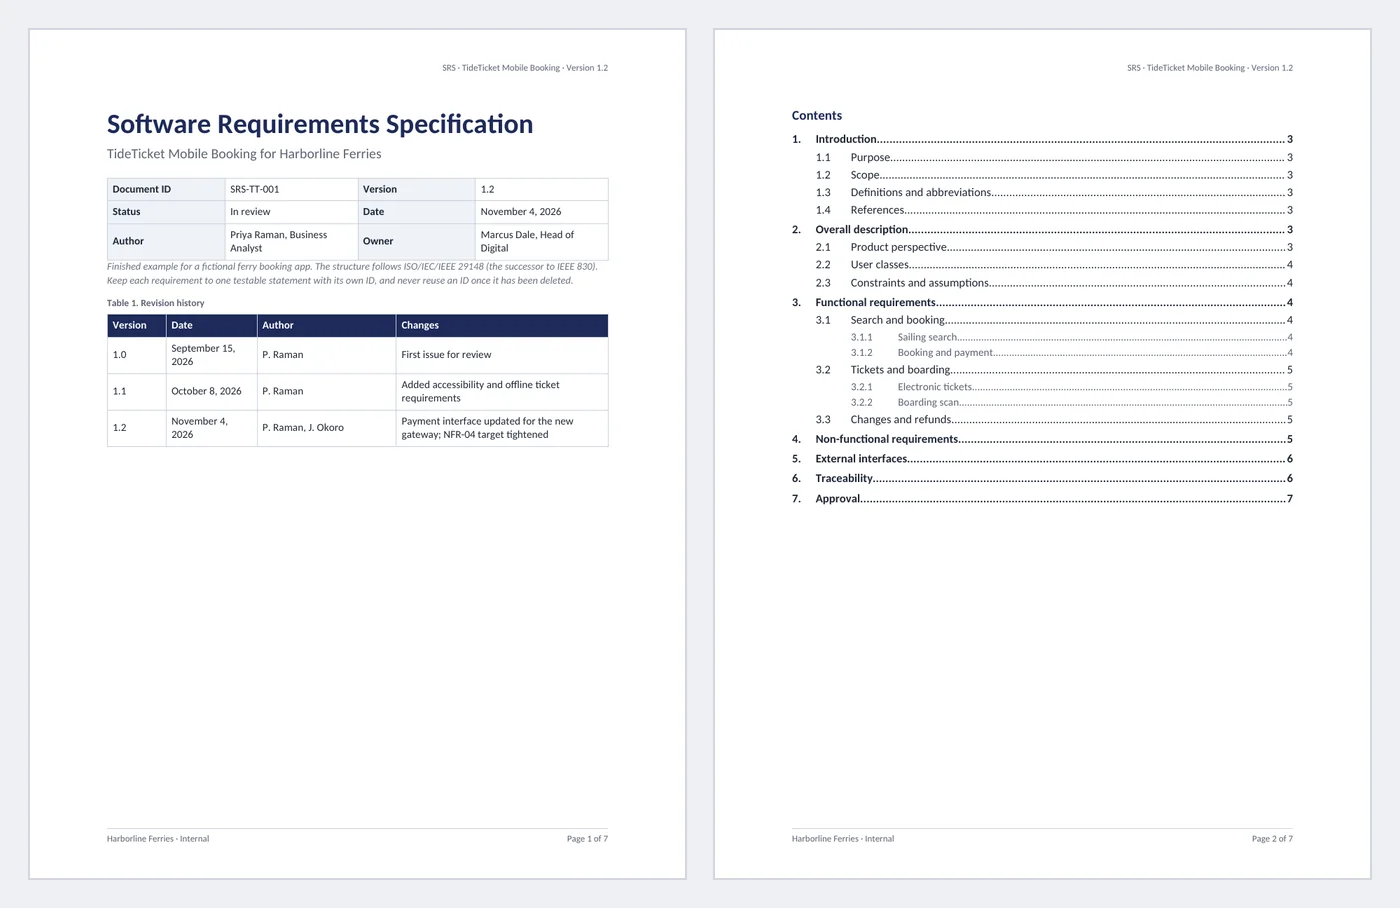
What's inside
The document has 7 pages. Each part below is a heading in the file, so you can jump to it from the Navigation Pane (View > Navigation Pane).
| Part | What it covers | What you write |
|---|---|---|
| Cover and control | Which document and which version | ID, version, status, date, author, owner, revision history |
| 1. Introduction | Why the document exists and what is in scope | Purpose, scope, definitions, references |
| 2. Overall description | The product in context | Product perspective, user classes, constraints and assumptions |
| 3. Functional requirements | What the system must do | Grouped by feature (Heading 2) and function (Heading 3), one row per requirement |
| 4–5. Quality and interfaces | How well, and what it connects to | Performance, availability, accessibility, security targets; external systems |
| 6–7. Traceability and approval | Proof of coverage and agreement | Objective-to-test matrix with status; four signatures |
Before you start
- List the business objectives first. Every requirement should trace back to one, or it probably does not belong in this release.
- Agree the priority scale with the product owner. This template uses MoSCoW (Must, Should, Could, Won’t this release).
- Decide the numbering rule for IDs (FR-, NFR-) and never reuse a deleted ID.
Step-by-step guide
Fill in document control
Type the ID, version, author and owner, pick the status and date, and add a revision history row for each issued version.
Write scope and definitions
Say what is in and out of scope in plain sentences, and define every term or abbreviation a tester might read two ways.
Group requirements by feature
Use Heading 2 for each feature and Heading 3 for each function inside it. The numbers and the table of contents follow automatically.
Write one requirement per row
Use “shall” for mandatory behavior, give each row a new ID, then pick its priority and how it will be verified from the dropdowns.
Set measurable quality targets
Give every non-functional requirement a number and a condition (2 seconds for 95% of requests at 500 users), not adjectives like “fast”.
Trace, update and approve
Fill in the traceability matrix, update the table of contents, set the status to Approved and collect the signatures.
Field and control map
Every content control and field in the document, in the order they appear. Gray-boxed fields in Word are the content controls.
| Name | Type | Where | Value in the sample |
|---|---|---|---|
| Product name header | Text | Header | TideTicket Mobile Booking |
| Version header | Text | Header | 1.2 |
| Product name | Text | Body | TideTicket Mobile Booking |
| Client | Text | Body | Harborline Ferries |
| Document ID | Text | Body | SRS-TT-001 |
| Version | Text | Body | 1.2 |
| Document status | Dropdown | Body | In review (Draft / In review / Approved / Superseded) |
| Document date | Date picker | Body | November 4, 2026 |
| Author | Text | Body | Priya Raman, Business Analyst |
| Product owner | Text | Body | Marcus Dale, Head of Digital |
| Rev 1.0 date | Date picker | Body | September 15, 2026 |
| Rev 1.1 date | Date picker | Body | October 8, 2026 |
| Rev 1.2 date | Date picker | Body | November 4, 2026 |
| Priority FR-01 | Dropdown | Body | Must (Must / Should / Could / Won't (this release)) |
| Verification FR-01 | Dropdown | Body | Test (Test / Inspection / Analysis / Demonstration) |
| Priority FR-02 | Dropdown | Body | Must (Must / Should / Could / Won't (this release)) |
| Verification FR-02 | Dropdown | Body | Test (Test / Inspection / Analysis / Demonstration) |
| Priority FR-03 | Dropdown | Body | Should (Must / Should / Could / Won't (this release)) |
| Verification FR-03 | Dropdown | Body | Demonstration (Test / Inspection / Analysis / Demonstration) |
| Priority FR-04 | Dropdown | Body | Must (Must / Should / Could / Won't (this release)) |
| Verification FR-04 | Dropdown | Body | Test (Test / Inspection / Analysis / Demonstration) |
| Priority FR-05 | Dropdown | Body | Must (Must / Should / Could / Won't (this release)) |
| Verification FR-05 | Dropdown | Body | Test (Test / Inspection / Analysis / Demonstration) |
| Priority FR-06 | Dropdown | Body | Must (Must / Should / Could / Won't (this release)) |
| Verification FR-06 | Dropdown | Body | Inspection (Test / Inspection / Analysis / Demonstration) |
| Priority FR-07 | Dropdown | Body | Could (Must / Should / Could / Won't (this release)) |
| Verification FR-07 | Dropdown | Body | Demonstration (Test / Inspection / Analysis / Demonstration) |
| Priority FR-08 | Dropdown | Body | Must (Must / Should / Could / Won't (this release)) |
| Verification FR-08 | Dropdown | Body | Test (Test / Inspection / Analysis / Demonstration) |
| Priority FR-09 | Dropdown | Body | Should (Must / Should / Could / Won't (this release)) |
| Verification FR-09 | Dropdown | Body | Test (Test / Inspection / Analysis / Demonstration) |
| Priority FR-10 | Dropdown | Body | Must (Must / Should / Could / Won't (this release)) |
| Verification FR-10 | Dropdown | Body | Test (Test / Inspection / Analysis / Demonstration) |
| Priority FR-11 | Dropdown | Body | Must (Must / Should / Could / Won't (this release)) |
| Verification FR-11 | Dropdown | Body | Analysis (Test / Inspection / Analysis / Demonstration) |
| Priority FR-12 | Dropdown | Body | Must (Must / Should / Could / Won't (this release)) |
| Verification FR-12 | Dropdown | Body | Test (Test / Inspection / Analysis / Demonstration) |
| Priority FR-13 | Dropdown | Body | Must (Must / Should / Could / Won't (this release)) |
| Verification FR-13 | Dropdown | Body | Demonstration (Test / Inspection / Analysis / Demonstration) |
| Priority FR-14 | Dropdown | Body | Won't (this release) (Must / Should / Could / Won't (this release)) |
| Verification FR-14 | Dropdown | Body | Inspection (Test / Inspection / Analysis / Demonstration) |
| Verification NFR-01 | Dropdown | Body | Test (Test / Inspection / Analysis / Demonstration) |
| Verification NFR-02 | Dropdown | Body | Analysis (Test / Inspection / Analysis / Demonstration) |
| Verification NFR-03 | Dropdown | Body | Inspection (Test / Inspection / Analysis / Demonstration) |
| Verification NFR-04 | Dropdown | Body | Test (Test / Inspection / Analysis / Demonstration) |
| Verification NFR-05 | Dropdown | Body | Inspection (Test / Inspection / Analysis / Demonstration) |
| Verification NFR-06 | Dropdown | Body | Demonstration (Test / Inspection / Analysis / Demonstration) |
| Trace FR-01 | Dropdown | Body | Covered (Not started / Covered / Passed / Failed) |
| Trace FR-04 | Dropdown | Body | Covered (Not started / Covered / Passed / Failed) |
| Trace FR-08 | Dropdown | Body | Covered (Not started / Covered / Passed / Failed) |
| Trace FR-12 | Dropdown | Body | Not started (Not started / Covered / Passed / Failed) |
| Trace NFR | Dropdown | Body | Covered (Not started / Covered / Passed / Failed) |
| Approver owner | Text | Body | Marcus Dale, Head of Digital |
| Signed date | Date picker | Body | 4 fields: Click or tap to enter a date. |
| Approver delivery | Text | Body | Jon Okoro, Delivery Manager |
| Approver QA | Text | Body | Ana Lucero, QA Lead |
| Approver ops | Text | Body | Glen Hart, Operations Director |
{ TOC \o "1-3" \h \z \u } | Field | Body | contents list |
{ PAGE } | Field | Footer | 1 |
{ NUMPAGES } | Field | Footer | 7 |
{ SEQ Table \* ARABIC } | Field | Body | 1, 2, 3 |
Every field, control and style, explained
The code in each card is read straight from the .docx file (the XML Word stores, or the field code you see with Alt+F9), so it is exactly what the template contains.
<w:lvl w:ilvl="0">
  <w:start w:val="1"/>
  <w:numFmt w:val="decimal"/>
  <w:pStyle w:val="Heading1"/>
  <w:lvlText w:val="%1."/>
  <w:lvlJc w:val="left"/>
  <w:pPr>
    <w:ind w:left="440" w:hanging="440"/>
  </w:pPr>
</w:lvl>
<w:lvl w:ilvl="1">
  <w:start w:val="1"/>
  <w:numFmt w:val="decimal"/>
  <w:pStyle w:val="Heading2"/>
  <w:lvlText w:val="%1.%2"/>
  <w:lvlJc w:val="left"/>
  <w:pPr>
    <w:ind w:left="660" w:hanging="660"/>
  </w:pPr>
</w:lvl>
<w:lvl w:ilvl="2">
  <w:start w:val="1"/>
  <w:numFmt w:val="decimal"/>
  <w:pStyle w:val="Heading3"/>
  <w:lvlText w:val="%1.%2.%3"/>
  <w:lvlJc w:val="left"/>
  <w:pPr>
    <w:ind w:left="880" w:hanging="880"/>
  </w:pPr>
</w:lvl>
The section numbers (1., 2., 6.1 …) are not typed. A multilevel list is linked to the Heading 1, Heading 2 and Heading 3 styles, so any paragraph you set to Heading 1 gets the next number and the table of contents picks it up.
Piece by piece
<w:pStyle w:val="Heading1"/>- Links list level 1 to the Heading 1 style (level 2 to Heading 2).
<w:lvlText w:val="%1."/>- Level 1 shows its counter and a period: 1., 2., 3.
<w:lvlText w:val="%1.%2"/>- Level 2 shows the parent number, a period and its own counter: 6.1, 6.2.
<w:ind w:left="440" w:hanging="440"/>- Hanging indent so wrapped heading text lines up after the number.
<w:lvlText w:val="%1.%2.%3"/>- Level 3 (Heading 3) adds a third counter: 3.1.1, 3.1.2. It restarts under each new Heading 2.
In the sample: 1. Introduction, 1.1 Purpose, 1.2 Scope … (21 headings)
How it is used: To add a section, type the heading, then pick Heading 1 (Ctrl+Alt+1), Heading 2 (Ctrl+Alt+2) or Heading 3 (Ctrl+Alt+3) on the Home tab. Numbers after it update by themselves.
How to change it: Home > Multilevel List > Define New Multilevel List to change the format (for example "Section 1"). Keep "Link level to style" set to Heading 1 and Heading 2.
Learn this: How to Plan and Structure Long Documents in Word: Outline View and Multilevel Numbering →{ TOC \o "1-3" \h \z \u }A TOC field builds the contents list from the Heading 1, Heading 2 and Heading 3 paragraphs. The file ships with the entries and page numbers already filled in, so it looks right the moment you open it.
Piece by piece
\o "1-3"- Include heading levels 1 to 3.
\h- Make each entry a link to its heading (Ctrl+click in Word).
\z- Hide page numbers in Web Layout view.
\u- Use the paragraph outline level, so the styles decide what is listed.
In the sample: 21 entries. First: 1. Introduction … page 3
How it is used: After you add or rename sections, right-click the contents list and choose Update Field > Update entire table.
How to change it: References > Table of Contents > Custom Table of Contents: set "Show levels" to 2 to leave Heading 3 out of the list.
Learn this: How to Add a Table of Contents, Captions, and Cross-References in Word →Page { PAGE } of { NUMPAGES }The footer counts pages with two fields: PAGE is the current page and NUMPAGES is the total. Both recalculate when the document is printed, saved as PDF or scrolled in Print Layout.
Piece by piece
PAGE- The number of the page the field sits on.
NUMPAGES- The total number of pages in the document.
In the sample: Page 1 of 7 on the first page
How it is used: Nothing to do: add or delete pages and the numbers follow.
How to change it: Double-click the footer to edit the text around the fields. Insert > Page Number > Format Page Numbers sets the starting number.
Learn this: How to Set Up Pages in Word: Margins, Breaks, Headers, Footers, and Page Numbers →{ SEQ Table \* ARABIC }Each table caption uses a SEQ field that counts tables in order. Insert a new captioned table in the middle and every later caption renumbers.
Piece by piece
SEQ Table- A counter named "Table". Every SEQ Table field adds 1.
\* ARABIC- Show the counter as 1, 2, 3.
In the sample: 3 caption(s): Table 1 to Table 3
How it is used: Captions are what a "see Table 2" cross-reference points to (References > Cross-reference).
How to change it: References > Insert Caption adds a new one. If numbers look stale, press Ctrl+A then F9 to update all fields.
Learn this: How to Add a Table of Contents, Captions, and Cross-References in Word →<w:sdtPr>
<w:alias w:val="Product name"/>
<w:tag w:val="product_name"/>
<w:text/>
</w:sdtPr>Names, numbers and other details people change every time are plain text content controls. Click one and type: the text replaces the sample, keeps the formatting, and the field still shows its name when selected.
Piece by piece
<w:alias w:val="…"/>- The title shown on the control’s tab when you click it.
<w:tag w:val="…"/>- A machine-readable name, useful for mail merge or code.
<w:text/>- Plain text: one line, one format, so pasted text cannot break the layout.
<w:showingPlcHdr/>- Present when the field shows gray placeholder text instead of a value.
In the sample: Product name = TideTicket Mobile Booking
How it is used: 12 in this template: Product name header, Version header, Product name, Client, Document ID, Version, Author, Product owner, Approver owner, Approver delivery, Approver QA, Approver ops. Use Developer > Design Mode to see every control at once, or the Selection Pane to jump between them.
How to change it: Developer > Properties changes the title, tag and placeholder. To show the Developer tab: File > Options > Customize Ribbon > Developer.
Learn this: How to Create Fillable Forms with Content Controls in Word →<w:sdtPr>
<w:alias w:val="Document date"/>
<w:tag w:val="document_date"/>
<w:date w:fullDate="2026-11-04T00:00:00Z">
<w:dateFormat w:val="MMMM d, yyyy"/>
<w:lid w:val="en-US"/>
<w:storeMappedDataAs w:val="dateTime"/>
<w:calendar w:val="gregorian"/>
</w:date>
</w:sdtPr>Dates are date picker content controls: click the arrow to pick from a calendar, or type a date in any format and Word shows it as "November 2, 2026".
Piece by piece
w:fullDate- The stored date, independent of how it is shown.
<w:dateFormat w:val="MMMM d, yyyy"/>- Display format: full month name, day, four-digit year.
<w:lid w:val="en-US"/>- Language used for month names.
<w:storeMappedDataAs w:val="dateTime"/>- Stores a real date value if the control is mapped to data.
In the sample: Document date = November 4, 2026
How it is used: 8 in this template: Document date, Rev 1.0 date, Rev 1.1 date, Rev 1.2 date, Signed date. Pick the date from the calendar so every date in the document has the same format.
How to change it: Developer > Properties > Display the date like this, for example d MMMM yyyy or yyyy-MM-dd.
Learn this: How to Create Fillable Forms with Content Controls in Word →<w:sdtPr>
<w:alias w:val="Document status"/>
<w:tag w:val="document_status"/>
<w:dropDownList>
<w:listItem w:displayText="Draft" w:value="Draft"/>
<w:listItem w:displayText="In review" w:value="In review"/>
<w:listItem w:displayText="Approved" w:value="Approved"/>
<w:listItem w:displayText="Superseded" w:value="Superseded"/>
</w:dropDownList>
</w:sdtPr>Fields with a fixed set of answers are dropdown list content controls, so everyone uses the same words (useful when you search or count documents later).
Piece by piece
<w:dropDownList>- A list the reader must pick from (no free typing).
<w:listItem w:displayText="…" w:value="…"/>- One choice: the text shown and the value stored.
In the sample: Document status = In review (Draft / In review / Approved / Superseded)
How it is used: 40 in this template: Document status, Priority FR-01, Verification FR-01, Priority FR-02, Verification FR-02, Priority FR-03, Verification FR-03, Priority FR-04, Verification FR-04, Priority FR-05, Verification FR-05, Priority FR-06, Verification FR-06, Priority FR-07, Verification FR-07, Priority FR-08, Verification FR-08, Priority FR-09, Verification FR-09, Priority FR-10, Verification FR-10, Priority FR-11, Verification FR-11, Priority FR-12, Verification FR-12, Priority FR-13, Verification FR-13, Priority FR-14, Verification FR-14, Verification NFR-01, Verification NFR-02, Verification NFR-03, Verification NFR-04, Verification NFR-05, Verification NFR-06, Trace FR-01, Trace FR-04, Trace FR-08, Trace FR-12, Trace NFR. Click the field and choose from the list.
How to change it: Developer > Properties > Add, Modify or Remove choices. Use a Combo Box instead if people need to type their own answer.
Learn this: How to Create Fillable Forms with Content Controls in Word →<w:trPr>
<w:cantSplit/>
<w:tblHeader/>
</w:trPr>Header rows are marked to repeat at the top of each page when a table breaks, and rows are set not to split across pages, so a long table stays readable when printed.
Piece by piece
<w:tblHeader/>- Repeat this row at the top of each page.
<w:cantSplit/>- Keep each row on one page.
In the sample: 10 of 13 tables repeat their header row
How it is used: Add rows with Tab in the last cell; the header keeps repeating.
How to change it: Click in the header row > Table Layout > Repeat Header Rows. Short tables are also set to keep with the next paragraph so they do not split.
Learn this: How to Build and Format Tables That Read Well in Word →<w:style w:type="paragraph" w:styleId="Guidance">
<w:name w:val="Guidance"/>
<w:basedOn w:val="Normal"/>
<w:pPr>
<w:spacing w:after="100"/>
</w:pPr>
<w:rPr>
<w:i/>
<w:iCs/>
<w:color w:val="6B7280"/>
<w:sz w:val="19"/>
</w:rPr>
</w:style>Instructions for whoever fills in the template use a Guidance style (gray italics). Delete them before you send the document; with a style, Find and Replace can remove them all at once.
Piece by piece
<w:i/>- Italic.
<w:color w:val="6B7280"/>- Gray text.
In the sample: One note under the title block.
How it is used: Home > Replace > More > Format > Style > Guidance finds every note.
How to change it: Right-click Guidance in the Styles gallery > Modify.
Learn this: How to Use Styles and the Navigation Pane in Word →Tips and limits
- A requirement that cannot be verified is a wish. If you cannot pick Test, Inspection, Analysis or Demonstration for it, rewrite it.
- Keep design decisions out. “The app shall store tickets offline” is a requirement; “use SQLite” is a design choice.
- Mark what is deliberately out of this release as Won’t: it stops the same request coming back every sprint.
- After approval, change requirements only through change control and add a revision history row each time.
- For agile teams the same structure works as a living document: keep the IDs stable and link user stories to them.
Learn the skills behind this template
Was this guide helpful? Spot a mistake? Send feedback · admin@arumsoft.com