Project Post-Mortem and Lessons Learned Report Template for Word
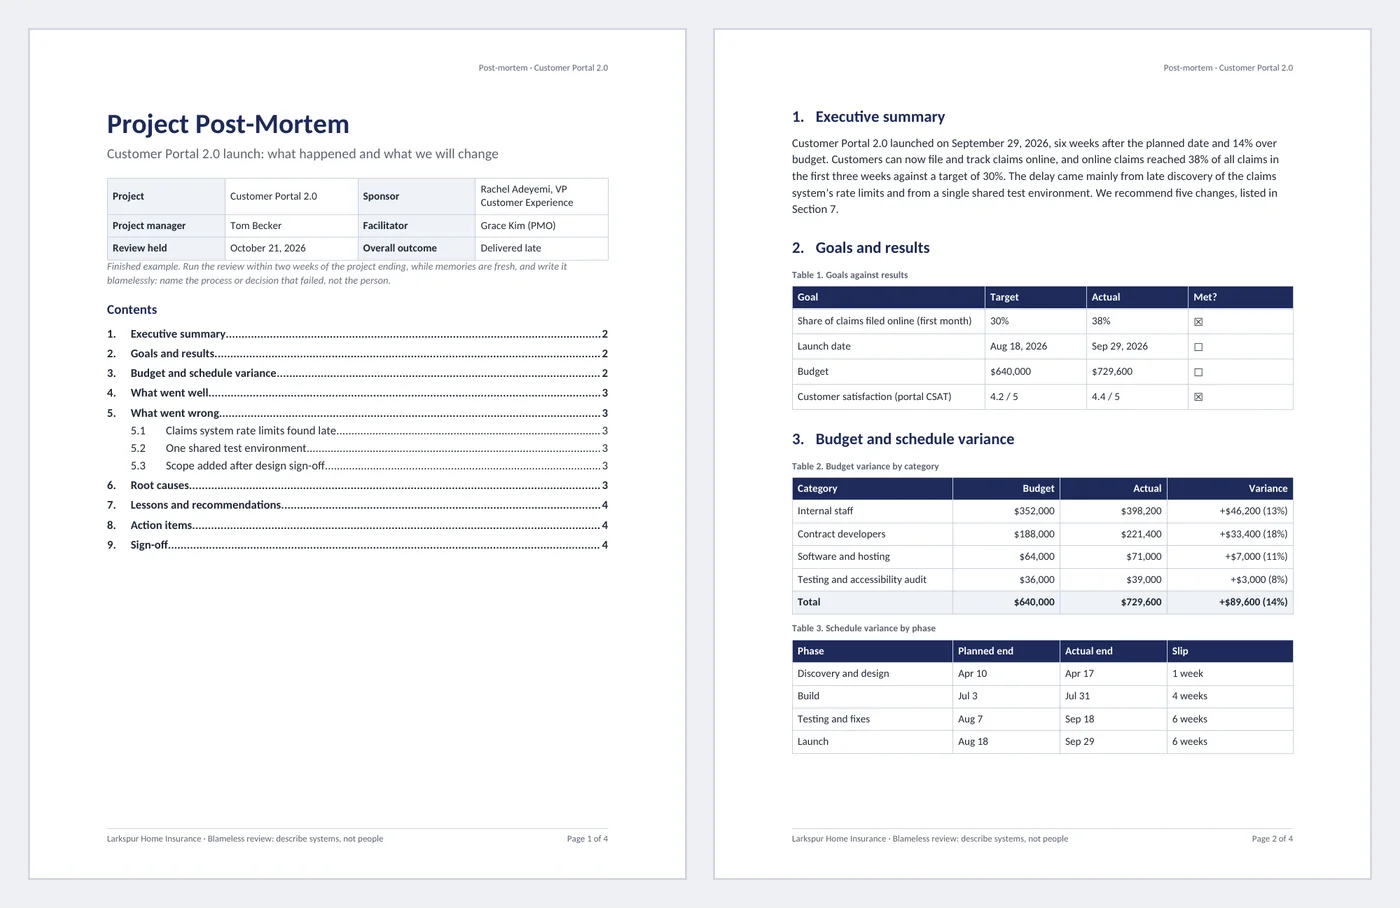
A post-mortem is only useful if it changes what the next project does. This report is built for that: it compares goals and numbers with what actually happened, traces the biggest problem to a root cause, and ends with owned, dated actions rather than a list of feelings. It is a finished four-page example of a fictional insurance portal launch, written blamelessly.
- Pages:
- 4
- Works with:
- Word for Microsoft 365, Word 2016 or later, Word for Mac (Word for the web can fill in fields)
- Updated:
Project Post-Mortem Report Template.docx
Free to download. No sign-up needed. No macros.
What you can do with it
- Summary block with fill-in fields, a review date picker and an outcome dropdown
- Goals table with met checkboxes; budget variance by category and schedule variance by phase
- What went well, what went wrong, and a five whys chain ending in a root cause callout
- Lessons learned table and action items with owners, due-date pickers and status dropdowns
What's inside
The document has 4 pages. Each part below is a heading in the file, so you can jump to it from the Navigation Pane (View > Navigation Pane).
| Part | What it covers | What you write |
|---|---|---|
| Summary block | Which project, who took part and the overall outcome | Project, sponsor, PM, facilitator, review date, outcome |
| 1–3. Summary, goals, variance | How the result compares with the plan | Executive summary, goals vs. actuals, budget and schedule variance |
| 4–6. Went well, went wrong, root causes | What happened and why | Strengths, problems by heading, five whys, root cause |
| 7–8. Lessons and actions | What will change | Lesson, area, recommendation; action, owner, due date, status |
| 9. Sign-off | Who accepts the findings | Sponsor and project manager |
Before you start
- Book the review within two weeks of the project end and invite people from every team involved, not only managers.
- Collect the numbers first: planned and actual dates, budget by category, and the original goals.
- Agree on the blameless rule at the start: we describe decisions and systems, not people.
Step-by-step guide
Fill in the summary block
Type the project, sponsor, manager and facilitator, pick the review date and choose the overall outcome from the dropdown.
Compare plan and actual
Replace the goals table rows and tick Met where the target was reached. Fill in budget by category and the end date of each phase.
Write what went well and wrong
List strengths as bullets. Give each problem its own Heading 2 with a short factual description: what happened, when, and the effect.
Find the root cause
Take the biggest problem and ask "why" until you reach something a process change can fix. Put the answer in the Root cause callout.
Turn lessons into actions
For each lesson write a recommendation, then an action with an owner, a due date and a status from the dropdown. Update the status as actions close.
Share and sign off
Update the table of contents, delete the gray note, get the sponsor’s and manager’s sign-off and share the report with every project manager.
Field and control map
Every content control and field in the document, in the order they appear. Gray-boxed fields in Word are the content controls.
| Name | Type | Where | Value in the sample |
|---|---|---|---|
| Project name | Text | Header | Customer Portal 2.0 |
| Project name | Text | Body | Customer Portal 2.0 |
| Sponsor | Text | Body | Rachel Adeyemi, VP Customer Experience |
| Project manager | Text | Body | Tom Becker |
| Facilitator | Text | Body | Grace Kim (PMO) |
| Review date | Date picker | Body | October 21, 2026 |
| Outcome | Dropdown | Body | Delivered late (Delivered as planned / Delivered late / Delivered over budget / Partially delivered / Cancelled) |
| Goal 1 met | Checkbox | Body | checked |
| Goal 2 met | Checkbox | Body | unchecked |
| Goal 3 met | Checkbox | Body | unchecked |
| Goal 4 met | Checkbox | Body | checked |
| Action 1 due | Date picker | Body | November 20, 2026 |
| Action 1 status | Dropdown | Body | In progress (Not started / In progress / Done / Dropped) |
| Action 2 due | Date picker | Body | December 11, 2026 |
| Action 2 status | Dropdown | Body | Not started (Not started / In progress / Done / Dropped) |
| Action 3 due | Date picker | Body | November 30, 2026 |
| Action 3 status | Dropdown | Body | Not started (Not started / In progress / Done / Dropped) |
| Action 4 due | Date picker | Body | October 28, 2026 |
| Action 4 status | Dropdown | Body | Done (Not started / In progress / Done / Dropped) |
| Sponsor signer | Text | Body | Rachel Adeyemi |
| Signed date | Date picker | Body | 2 fields: Click or tap to enter a date. |
| PM signer | Text | Body | Tom Becker |
| Company | Text | Footer | Larkspur Home Insurance |
{ TOC \o "1-2" \h \z \u } | Field | Body | contents list |
{ PAGE } | Field | Footer | 1 |
{ NUMPAGES } | Field | Footer | 4 |
{ SEQ Table \* ARABIC } | Field | Body | 1, 2, 3, 4, 5 |
Every field, control and style, explained
The code in each card is read straight from the .docx file (the XML Word stores, or the field code you see with Alt+F9), so it is exactly what the template contains.
<w:lvl w:ilvl="0">
  <w:start w:val="1"/>
  <w:numFmt w:val="decimal"/>
  <w:pStyle w:val="Heading1"/>
  <w:lvlText w:val="%1."/>
  <w:lvlJc w:val="left"/>
  <w:pPr>
    <w:ind w:left="440" w:hanging="440"/>
  </w:pPr>
</w:lvl>
<w:lvl w:ilvl="1">
  <w:start w:val="1"/>
  <w:numFmt w:val="decimal"/>
  <w:pStyle w:val="Heading2"/>
  <w:lvlText w:val="%1.%2"/>
  <w:lvlJc w:val="left"/>
  <w:pPr>
    <w:ind w:left="660" w:hanging="660"/>
  </w:pPr>
</w:lvl>
The section numbers (1., 2., 6.1 …) are not typed. A multilevel list is linked to the Heading 1 and Heading 2 styles, so any paragraph you set to Heading 1 gets the next number and the table of contents picks it up.
Piece by piece
<w:pStyle w:val="Heading1"/>- Links list level 1 to the Heading 1 style (level 2 to Heading 2).
<w:lvlText w:val="%1."/>- Level 1 shows its counter and a period: 1., 2., 3.
<w:lvlText w:val="%1.%2"/>- Level 2 shows the parent number, a period and its own counter: 6.1, 6.2.
<w:ind w:left="440" w:hanging="440"/>- Hanging indent so wrapped heading text lines up after the number.
In the sample: 1. Executive summary, 2. Goals and results, 3. Budget and schedule variance … (12 headings)
How it is used: To add a section, type the heading, then pick Heading 1 (Ctrl+Alt+1) or Heading 2 (Ctrl+Alt+2) on the Home tab. Numbers after it update by themselves.
How to change it: Home > Multilevel List > Define New Multilevel List to change the format (for example "Section 1"). Keep "Link level to style" set to Heading 1 and Heading 2.
Learn this: How to Plan and Structure Long Documents in Word: Outline View and Multilevel Numbering →{ TOC \o "1-2" \h \z \u }A TOC field builds the contents list from the Heading 1 and Heading 2 paragraphs. The file ships with the entries and page numbers already filled in, so it looks right the moment you open it.
Piece by piece
\o "1-2"- Include heading levels 1 to 2.
\h- Make each entry a link to its heading (Ctrl+click in Word).
\z- Hide page numbers in Web Layout view.
\u- Use the paragraph outline level, so the styles decide what is listed.
In the sample: 12 entries. First: 1. Executive summary … page 2
How it is used: After you add or rename sections, right-click the contents list and choose Update Field > Update entire table.
How to change it: References > Table of Contents > Custom Table of Contents: set "Show levels" to 3 to list Heading 3 as well.
Learn this: How to Add a Table of Contents, Captions, and Cross-References in Word →Page { PAGE } of { NUMPAGES }The footer counts pages with two fields: PAGE is the current page and NUMPAGES is the total. Both recalculate when the document is printed, saved as PDF or scrolled in Print Layout.
Piece by piece
PAGE- The number of the page the field sits on.
NUMPAGES- The total number of pages in the document.
In the sample: Page 1 of 4 on the first page
How it is used: Nothing to do: add or delete pages and the numbers follow.
How to change it: Double-click the footer to edit the text around the fields. Insert > Page Number > Format Page Numbers sets the starting number.
Learn this: How to Set Up Pages in Word: Margins, Breaks, Headers, Footers, and Page Numbers →{ SEQ Table \* ARABIC }Each table caption uses a SEQ field that counts tables in order. Insert a new captioned table in the middle and every later caption renumbers.
Piece by piece
SEQ Table- A counter named "Table". Every SEQ Table field adds 1.
\* ARABIC- Show the counter as 1, 2, 3.
In the sample: 5 caption(s): Table 1 to Table 5
How it is used: Captions are what a "see Table 2" cross-reference points to (References > Cross-reference).
How to change it: References > Insert Caption adds a new one. If numbers look stale, press Ctrl+A then F9 to update all fields.
Learn this: How to Add a Table of Contents, Captions, and Cross-References in Word →<w:sdtPr>
<w:alias w:val="Project name"/>
<w:tag w:val="project_name"/>
<w:text/>
</w:sdtPr>Names, numbers and other details people change every time are plain text content controls. Click one and type: the text replaces the sample, keeps the formatting, and the field still shows its name when selected.
Piece by piece
<w:alias w:val="…"/>- The title shown on the control’s tab when you click it.
<w:tag w:val="…"/>- A machine-readable name, useful for mail merge or code.
<w:text/>- Plain text: one line, one format, so pasted text cannot break the layout.
<w:showingPlcHdr/>- Present when the field shows gray placeholder text instead of a value.
In the sample: Project name = Customer Portal 2.0
How it is used: 8 in this template: Project name, Sponsor, Project manager, Facilitator, Sponsor signer, PM signer, Company. Use Developer > Design Mode to see every control at once, or the Selection Pane to jump between them.
How to change it: Developer > Properties changes the title, tag and placeholder. To show the Developer tab: File > Options > Customize Ribbon > Developer.
Learn this: How to Create Fillable Forms with Content Controls in Word →<w:sdtPr>
<w:alias w:val="Review date"/>
<w:tag w:val="review_date"/>
<w:date w:fullDate="2026-10-21T00:00:00Z">
<w:dateFormat w:val="MMMM d, yyyy"/>
<w:lid w:val="en-US"/>
<w:storeMappedDataAs w:val="dateTime"/>
<w:calendar w:val="gregorian"/>
</w:date>
</w:sdtPr>Dates are date picker content controls: click the arrow to pick from a calendar, or type a date in any format and Word shows it as "November 2, 2026".
Piece by piece
w:fullDate- The stored date, independent of how it is shown.
<w:dateFormat w:val="MMMM d, yyyy"/>- Display format: full month name, day, four-digit year.
<w:lid w:val="en-US"/>- Language used for month names.
<w:storeMappedDataAs w:val="dateTime"/>- Stores a real date value if the control is mapped to data.
In the sample: Review date = October 21, 2026
How it is used: 7 in this template: Review date, Action 1 due, Action 2 due, Action 3 due, Action 4 due, Signed date. Pick the date from the calendar so every date in the document has the same format.
How to change it: Developer > Properties > Display the date like this, for example d MMMM yyyy or yyyy-MM-dd.
Learn this: How to Create Fillable Forms with Content Controls in Word →<w:sdtPr>
<w:alias w:val="Outcome"/>
<w:tag w:val="outcome"/>
<w:dropDownList>
<w:listItem w:displayText="Delivered as planned" w:value="Delivered as planned"/>
<w:listItem w:displayText="Delivered late" w:value="Delivered late"/>
<w:listItem w:displayText="Delivered over budget" w:value="Delivered over budget"/>
<w:listItem w:displayText="Partially delivered" w:value="Partially delivered"/>
<w:listItem w:displayText="Cancelled" w:value="Cancelled"/>
</w:dropDownList>
</w:sdtPr>Fields with a fixed set of answers are dropdown list content controls, so everyone uses the same words (useful when you search or count documents later).
Piece by piece
<w:dropDownList>- A list the reader must pick from (no free typing).
<w:listItem w:displayText="…" w:value="…"/>- One choice: the text shown and the value stored.
In the sample: Outcome = Delivered late (Delivered as planned / Delivered late / Delivered over budget / Partially delivered / Cancelled)
How it is used: 5 in this template: Outcome, Action 1 status, Action 2 status, Action 3 status, Action 4 status. Click the field and choose from the list.
How to change it: Developer > Properties > Add, Modify or Remove choices. Use a Combo Box instead if people need to type their own answer.
Learn this: How to Create Fillable Forms with Content Controls in Word →<w:sdtPr>
<w:alias w:val="Goal 1 met"/>
<w:tag w:val="goal_1_met"/>
<w14:checkbox>
<w14:checked w14:val="1"/>
<w14:checkedState w14:val="2612" w14:font="MS Gothic"/>
<w14:uncheckedState w14:val="2610" w14:font="MS Gothic"/>
</w14:checkbox>
</w:sdtPr>Checklist boxes are checkbox content controls: click to tick or untick. They print as ☒ and ☐.
Piece by piece
<w14:checked w14:val="…"/>- 1 when ticked, 0 when not.
<w14:checkedState w14:val="2612"/>- Symbol for ticked: U+2612 ☒.
<w14:uncheckedState w14:val="2610"/>- Symbol for unticked: U+2610 ☐.
In the sample: 2 of 4 ticked in the sample
How it is used: 4 in this template: Goal 1 met, Goal 2 met, Goal 3 met, Goal 4 met. Click the box. Checkboxes need Word 2010 or later; very old versions show a static symbol.
How to change it: Developer > Properties > Checked symbol > Change, for example to ✓ (Wingdings 2).
Learn this: How to Create Fillable Forms with Content Controls in Word →<w:style w:type="paragraph" w:styleId="Callout">
<w:name w:val="Callout"/>
<w:basedOn w:val="Normal"/>
<w:pPr>
<w:pBdr>
<w:left w:val="single" w:color="F2A93B" w:sz="24" w:space="8"/>
</w:pBdr>
<w:shd w:fill="EEF2F8" w:color="auto" w:val="clear"/>
<w:spacing w:after="160" w:before="120"/>
<w:ind w:left="180" w:right="180"/>
</w:pPr>
<w:rPr>
<w:sz w:val="21"/>
</w:rPr>
</w:style>Notes and warnings use a paragraph style named Callout: tinted background, amber bar on the left, indented on both sides. Because it is a style, every callout matches and you can restyle them all at once.
Piece by piece
<w:shd w:fill="EEF2F8"/>- Light blue-gray background.
<w:left w:val="single" w:sz="24" w:color="F2A93B"/>- Amber bar, 3 pt wide, on the left edge.
<w:ind w:left="180" w:right="180"/>- Indented 1/8 inch on each side.
In the sample: Used for the notes, tips and warnings in the body.
How it is used: Put the cursor in a paragraph and pick Callout in the Styles gallery.
How to change it: Right-click Callout in the Styles gallery > Modify > Format > Border or Shading. All callouts change together.
Learn this: How to Use Styles and the Navigation Pane in Word →<w:trPr>
<w:cantSplit/>
<w:tblHeader/>
</w:trPr>Header rows are marked to repeat at the top of each page when a table breaks, and rows are set not to split across pages, so a long table stays readable when printed.
Piece by piece
<w:tblHeader/>- Repeat this row at the top of each page.
<w:cantSplit/>- Keep each row on one page.
In the sample: 5 of 7 tables repeat their header row
How it is used: Add rows with Tab in the last cell; the header keeps repeating.
How to change it: Click in the header row > Table Layout > Repeat Header Rows. Short tables are also set to keep with the next paragraph so they do not split.
Learn this: How to Build and Format Tables That Read Well in Word →<w:style w:type="paragraph" w:styleId="Guidance">
<w:name w:val="Guidance"/>
<w:basedOn w:val="Normal"/>
<w:pPr>
<w:spacing w:after="100"/>
</w:pPr>
<w:rPr>
<w:i/>
<w:iCs/>
<w:color w:val="6B7280"/>
<w:sz w:val="19"/>
</w:rPr>
</w:style>Instructions for whoever fills in the template use a Guidance style (gray italics). Delete them before you send the document; with a style, Find and Replace can remove them all at once.
Piece by piece
<w:i/>- Italic.
<w:color w:val="6B7280"/>- Gray text.
In the sample: One note under the title block.
How it is used: Home > Replace > More > Format > Style > Guidance finds every note.
How to change it: Right-click Guidance in the Styles gallery > Modify.
Learn this: How to Use Styles and the Navigation Pane in Word →Tips and limits
- Write about systems, not people: "the test environment was shared" rather than "the payments team broke the tests".
- Measure variance against the last approved plan, and say which plan that was.
- Five whys stops when the answer is something you control and can change; it is rarely one person.
- Status is a dropdown so a later review can count open actions across reports.
- Re-read the action items at the next project kickoff; that is where post-mortems pay off.
Learn the skills behind this template
Was this guide helpful? Spot a mistake? Send feedback · admin@arumsoft.com