APA 7th Edition Paper Template for Word
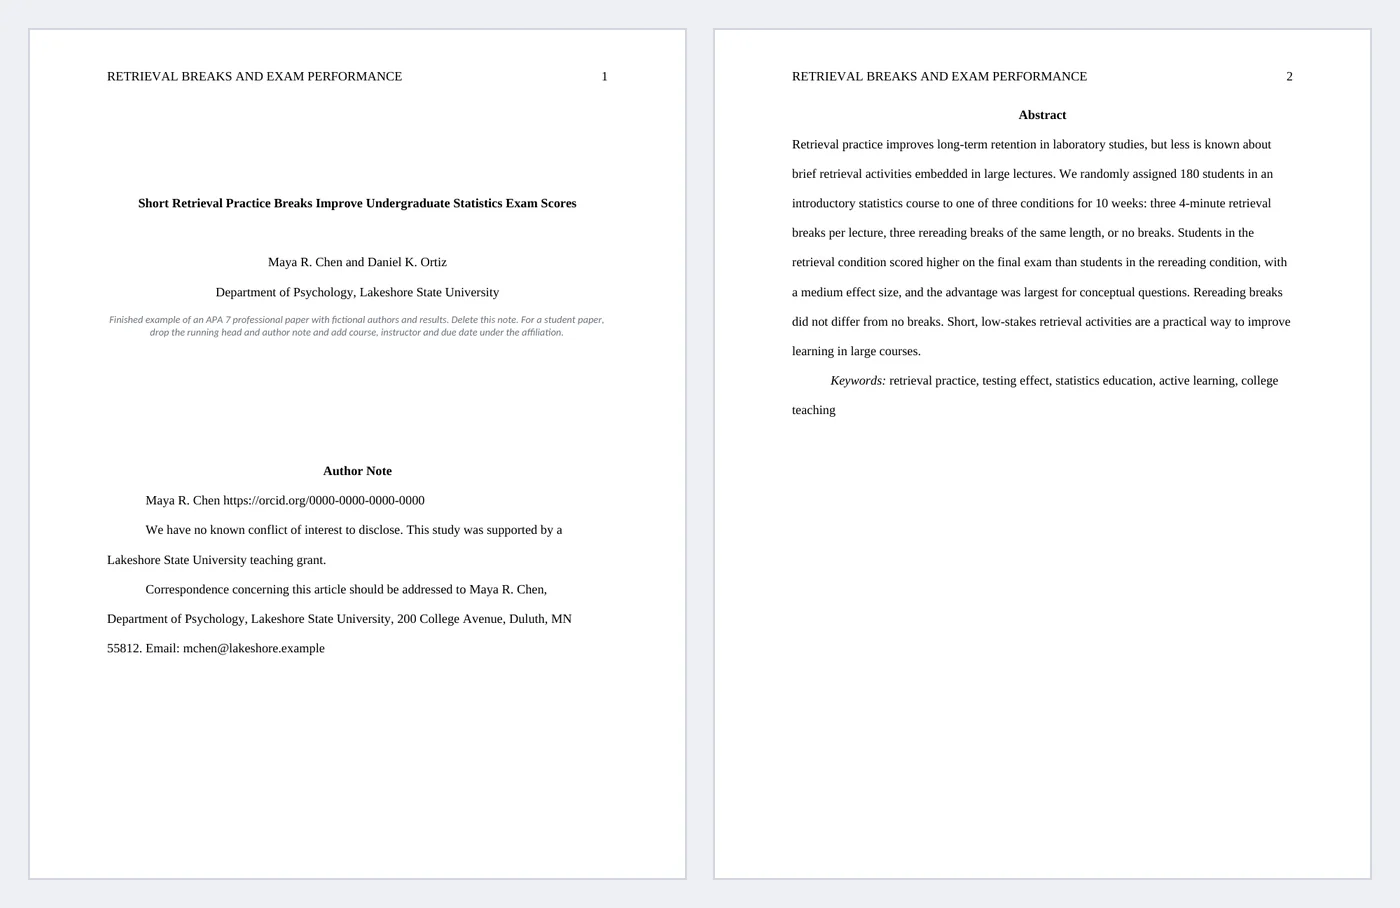
APA style is mostly formatting rules that are easy to get almost right: double spacing with no extra gaps, a half-inch first-line indent, five different heading looks, tables with only horizontal lines, and references with hanging indents. This template builds all of them into Word styles, so you write and the formatting stays correct. It is a finished five-page professional paper (fictional study, real references): title page, abstract, body with every heading level, one table and a reference list.
- Pages:
- 5
- Works with:
- Word for Microsoft 365, Word 2016 or later, Word for Mac (Word for the web can fill in fields)
- Updated:
What you can do with it
- Running head and page number in the header, set with a right tab stop
- Title page with title, authors, affiliation and author note; abstract with an italic Keywords label
- Heading 1–3 paragraph styles and run-in Heading 4–5 character styles, formatted exactly as APA 7 shows
- APA table (bold number, italic title, horizontal rules, note) and a Reference style with 0.5-inch hanging indent
What's inside
The document has 5 pages. Each part below is a heading in the file, so you can jump to it from the Navigation Pane (View > Navigation Pane).
| Part | What it covers | What you write |
|---|---|---|
| Title page | Who wrote the paper and where | Running head, title, authors, affiliation, author note |
| Abstract | The paper in one paragraph | Abstract label, 150–250 word paragraph, keywords |
| Body | Introduction, Method, Results, Discussion | Title as Level 1, then Level 1–5 headings, Table 1 with note |
| References | Every source cited | Alphabetical, hanging indent, DOI links |
Before you start
- Check whether you need a student or a professional paper. Professional papers (for journals) use a running head and author note; student papers usually do not, and add course, instructor and due date.
- Ask whether your instructor or journal changes any APA rule, such as the font or abstract length.
- Collect each source’s full details and DOI as you read.
Step-by-step guide
Fill in the title page
Type over the running head, title, authors and affiliation, and edit or delete the author note.
Write the abstract
One paragraph without indent, usually 250 words or fewer. Type your keywords after the italic label.
Write with heading styles
Pick Heading 1, 2 or 3 for headings on their own line. For Levels 4 and 5, select the first words of the paragraph and pick Heading 4 (run-in) or Heading 5 (run-in).
Add tables
Copy the Table 1 block: the bold number line, the italic title line, the table and the Note. The number is a field, so later tables become Table 2, 3.
Build the references
Type each reference as a paragraph in the Reference style, in alphabetical order, with the DOI as a https link.
Check and export
Delete the gray note on the title page, update fields (Ctrl+A, F9) and save as PDF if your instructor asks for one.
Field and control map
Every content control and field in the document, in the order they appear. Gray-boxed fields in Word are the content controls.
| Name | Type | Where | Value in the sample |
|---|---|---|---|
| Running head | Text | Header | RETRIEVAL BREAKS AND EXAM PERFORMANCE |
| Paper title | Text | Body | Short Retrieval Practice Breaks Improve Undergraduate Statistics Exam Scores |
| Authors | Text | Body | Maya R. Chen and Daniel K. Ortiz |
| Affiliation | Text | Body | Department of Psychology, Lakeshore State University |
| ORCID line | Text | Body | Maya R. Chen https://orcid.org/0000-0000-0000-0000 |
| Corresponding author | Text | Body | Maya R. Chen, Department of Psychology, Lakeshore State University, 200 College Avenue, Duluth, MN 55812. Email: mchen@lakeshore.example |
| Title repeat | Text | Body | Short Retrieval Practice Breaks Improve Undergraduate Statistics Exam Scores |
{ PAGE } | Field | Header | 1 |
{ SEQ Table \* ARABIC } | Field | Body | 1 |
Every field, control and style, explained
The code in each card is read straight from the .docx file (the XML Word stores, or the field code you see with Alt+F9), so it is exactly what the template contains.
<w:tab w:val="right" w:pos="9360"/>
{ PAGE }
The header holds the running head (a shortened title in capitals) at the left margin and a PAGE field at the right margin, separated by a right-aligned tab stop. It repeats on every page, including the title page.
Piece by piece
Running head- A plain-text content control, so you type the short title once.
<w:tab w:val="right" w:pos="9360"/>- Right tab stop at the right margin (6.5 in), so the number sits flush right.
PAGE- The current page number; it starts at 1 on the title page.
In the sample: RETRIEVAL BREAKS AND EXAM PERFORMANCE … 1
How it is used: Click the running head and type your short title in capitals (50 characters or fewer, including spaces).
How to change it: Double-click the header to edit it. Student papers in APA 7 need only the page number: delete the running head control.
Learn this: How to Set Up Pages in Word: Margins, Breaks, Headers, Footers, and Page Numbers →<w:style w:type="paragraph" w:styleId="Heading1">
<w:name w:val="Heading 1"/>
<w:basedOn w:val="Normal"/>
<w:next w:val="Normal"/>
<w:pPr>
<w:keepNext/>
<w:spacing w:after="0" w:before="0" w:line="480" w:lineRule="auto"/>
<w:jc w:val="center"/>
<w:outlineLvl w:val="0"/>
</w:pPr>
<w:rPr>
<w:b/>
<w:color w:val="000000"/>
<w:sz w:val="24"/>
</w:rPr>
</w:style>
<w:style w:type="paragraph" w:styleId="Heading3">
<w:name w:val="Heading 3"/>
<w:basedOn w:val="Normal"/>
<w:next w:val="Normal"/>
<w:pPr>
<w:keepNext/>
<w:spacing w:after="0" w:before="0" w:line="480" w:lineRule="auto"/>
<w:outlineLvl w:val="2"/>
</w:pPr>
<w:rPr>
<w:b/>
<w:i/>
<w:iCs/>
<w:color w:val="000000"/>
<w:sz w:val="24"/>
</w:rPr>
</w:style>
<w:style w:type="character" w:styleId="Heading4Run">
<w:name w:val="Heading 4 (run-in)"/>
<w:basedOn w:val="DefaultParagraphFont"/>
<w:uiPriority w:val="99"/>
<w:unhideWhenUsed/>
<w:rPr>
<w:b/>
</w:rPr>
</w:style>APA 7 uses five heading levels. Levels 1–3 are paragraph styles, so they appear in the Navigation pane: Level 1 centered bold, Level 2 flush-left bold, Level 3 flush-left bold italic. Levels 4 and 5 run into the paragraph they start, so they are character styles applied to the first words of an indented body paragraph, ending with a period.
Piece by piece
Heading1: <w:jc w:val="center"/> <w:b/>- Level 1: centered, bold, title case.
Heading2: <w:b/>- Level 2: flush left, bold, title case.
Heading3: <w:b/> <w:i/>- Level 3: flush left, bold italic, title case.
Heading4Run: <w:b/>- Level 4: bold run-in heading in an indented paragraph, ending with a period.
Heading5Run: <w:b/> <w:i/>- Level 5: bold italic run-in heading, ending with a period.
In the sample: Short Retrieval Practice Breaks Improve Undergraduate Statistics Exam Scores, Method, Participants, Materials and Procedure
How it is used: Type a heading on its own line and pick Heading 1, 2 or 3. For Levels 4–5, type the heading at the start of the paragraph, select it and pick Heading 4 (run-in) or Heading 5 (run-in) from the Styles gallery.
How to change it: Use levels in order: never skip from Level 1 to Level 3. The introduction gets no “Introduction” heading; the paper title on page 3 acts as its Level 1 heading.
Learn this: How to Use Styles and the Navigation Pane in Word →<w:style w:type="paragraph" w:styleId="BodyText">
<w:name w:val="Body Text"/>
<w:basedOn w:val="Normal"/>
<w:next w:val="BodyText"/>
<w:pPr>
<w:spacing w:after="0" w:before="0" w:line="480" w:lineRule="auto"/>
<w:ind w:firstLine="720"/>
</w:pPr>
</w:style>The whole paper is double-spaced with no extra space before or after paragraphs, 1-inch margins on every side, and a 0.5-inch first-line indent on body paragraphs. These live in the default paragraph settings and the Body Text style, so you never set them by hand.
Piece by piece
<w:spacing w:line="480" w:lineRule="auto"/>- Double spacing (480 = 2 × 240 twentieths of a point, measured as lines).
w:before="0" w:after="0"- No extra space between paragraphs, as APA requires.
<w:ind w:firstLine="720"/>- First line indented 0.5 inch (720 twips).
<w:pgMar w:top="1440" w:right="1440" w:bottom="1440" w:left="1440"/>- 1-inch margins (1,440 twips).
In the sample: Double-spaced throughout; body paragraphs indented 0.5 in.
How it is used: Just type. New paragraphs use Body Text and keep the spacing and indent. The abstract paragraph uses Normal, which has no indent.
How to change it: Font: APA accepts Times New Roman 12, Calibri 11, Arial 11 and others. Right-click Normal > Modify to change it once for the whole paper.
Learn this: How to Format Text and Paragraphs in Word: Fonts, Spacing, and Alignment →<w:style w:type="paragraph" w:styleId="Reference">
<w:name w:val="Reference"/>
<w:basedOn w:val="Normal"/>
<w:next w:val="Reference"/>
<w:pPr>
<w:spacing w:after="0" w:before="0" w:line="480" w:lineRule="auto"/>
<w:ind w:left="720" w:hanging="720"/>
</w:pPr>
</w:style>Each reference is one paragraph in the Reference style: the first line starts at the margin and every following line is indented 0.5 inch, so authors’ names stand out. DOIs are live links written as https://doi.org/….
Piece by piece
<w:ind w:left="720" w:hanging="720"/>- Hanging indent of 0.5 inch.
<w:spacing w:line="480"/>- Double-spaced like the rest of the paper.
w:hyperlink- Each DOI is a clickable link.
In the sample: 4 references in alphabetical order
How it is used: Start “References” on a new page. Type each reference as a paragraph in Reference style and keep them in alphabetical order by first author.
How to change it: Home > Paragraph dialog > Special: Hanging, 0.5" sets the same indent on any paragraph.
Learn this: How to Add Footnotes, Citations, and a Bibliography in Word →{ SEQ Table \* ARABIC }Each table caption uses a SEQ field that counts tables in order. Insert a new captioned table in the middle and every later caption renumbers.
Piece by piece
SEQ Table- A counter named "Table". Every SEQ Table field adds 1.
\* ARABIC- Show the counter as 1, 2, 3.
In the sample: 1 caption(s): Table 1
How it is used: Captions are what a "see Table 2" cross-reference points to (References > Cross-reference).
How to change it: References > Insert Caption adds a new one. If numbers look stale, press Ctrl+A then F9 to update all fields.
Learn this: How to Add a Table of Contents, Captions, and Cross-References in Word →<w:sdtPr>
<w:alias w:val="Paper title"/>
<w:tag w:val="paper_title"/>
<w:text/>
</w:sdtPr>Names, numbers and other details people change every time are plain text content controls. Click one and type: the text replaces the sample, keeps the formatting, and the field still shows its name when selected.
Piece by piece
<w:alias w:val="…"/>- The title shown on the control’s tab when you click it.
<w:tag w:val="…"/>- A machine-readable name, useful for mail merge or code.
<w:text/>- Plain text: one line, one format, so pasted text cannot break the layout.
<w:showingPlcHdr/>- Present when the field shows gray placeholder text instead of a value.
In the sample: Paper title = Short Retrieval Practice Breaks Improve Undergraduate Statistics Exam Scores
How it is used: 7 in this template: Running head, Paper title, Authors, Affiliation, ORCID line, Corresponding author, Title repeat. Use Developer > Design Mode to see every control at once, or the Selection Pane to jump between them.
How to change it: Developer > Properties changes the title, tag and placeholder. To show the Developer tab: File > Options > Customize Ribbon > Developer.
Learn this: How to Create Fillable Forms with Content Controls in Word →<w:trPr>
<w:cantSplit/>
<w:tblHeader/>
</w:trPr>Header rows are marked to repeat at the top of each page when a table breaks, and rows are set not to split across pages, so a long table stays readable when printed.
Piece by piece
<w:tblHeader/>- Repeat this row at the top of each page.
<w:cantSplit/>- Keep each row on one page.
In the sample: 1 of 1 tables repeat their header row
How it is used: Add rows with Tab in the last cell; the header keeps repeating.
How to change it: Click in the header row > Table Layout > Repeat Header Rows. Short tables are also set to keep with the next paragraph so they do not split.
Learn this: How to Build and Format Tables That Read Well in Word →<w:style w:type="paragraph" w:styleId="Guidance">
<w:name w:val="Guidance"/>
<w:basedOn w:val="Normal"/>
<w:pPr>
<w:spacing w:after="120" w:before="0" w:line="240" w:lineRule="auto"/>
</w:pPr>
<w:rPr>
<w:i/>
<w:iCs/>
<w:color w:val="6B7280"/>
<w:sz w:val="19"/>
</w:rPr>
</w:style>Instructions for whoever fills in the template use a Guidance style (gray italics). Delete them before you send the document; with a style, Find and Replace can remove them all at once.
Piece by piece
<w:i/>- Italic.
<w:color w:val="6B7280"/>- Gray text.
In the sample: One note under the title block.
How it is used: Home > Replace > More > Format > Style > Guidance finds every note.
How to change it: Right-click Guidance in the Styles gallery > Modify.
Learn this: How to Use Styles and the Navigation Pane in Word →Tips and limits
- Do not add blank lines between paragraphs or before headings; APA spacing comes from double spacing alone.
- The paper title is repeated in bold at the top of the first text page instead of an “Introduction” heading.
- Put each table on its own page after the references if your journal asks for that; otherwise place it after it is first mentioned.
- Use “et al.” in text from the first citation when a source has three or more authors.
- Word’s References > Citations tool can store sources, but check its APA output by hand; it often misses details.
Learn the skills behind this template
Was this guide helpful? Spot a mistake? Send feedback · admin@arumsoft.com