Nonprofit Sponsorship Tiers and Corporate Pitch Packet for Word
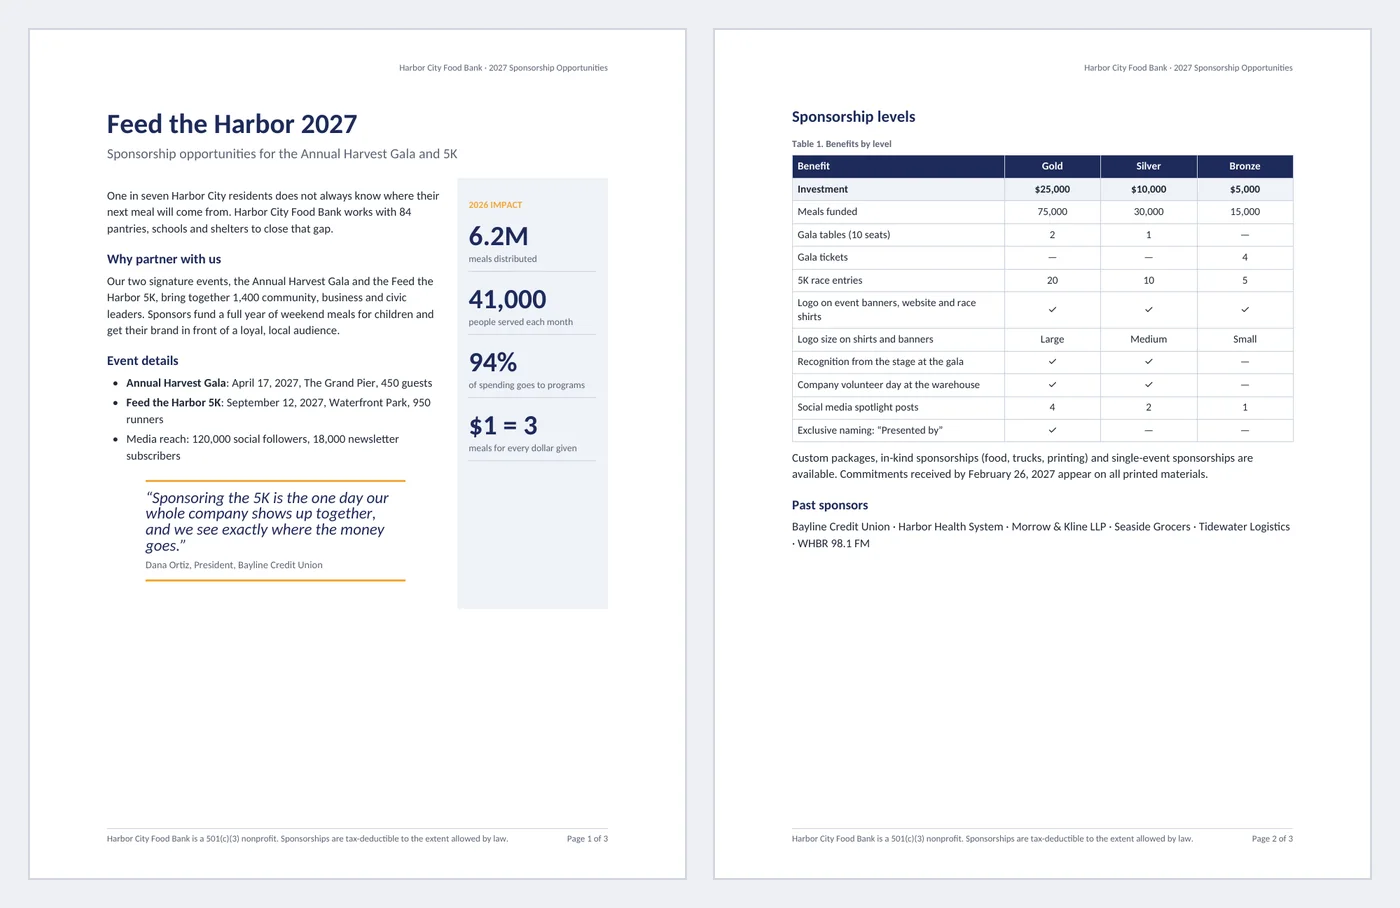
A sponsorship packet has to do two jobs: persuade a company that your cause and audience are worth their money, and make saying yes easy. This template is a finished three-page example for a fictional food bank: page one tells the story beside an impact sidebar of big numbers, page two compares Gold, Silver and Bronze benefits line by line, and page three is a commitment form the sponsor can fill in and sign.
- Pages:
- 3
- Works with:
- Word for Microsoft 365, Word 2016 or later, Word for Mac (Word for the web can fill in fields)
- Updated:
Nonprofit Sponsorship Packet Template.docx
Free to download. No sign-up needed. No macros.
What you can do with it
- Cover title and subtitle fields, a story column and a shaded sidebar of four Metric Value callouts
- Event dates as date pickers and a sponsor testimonial in the Pull Quote style
- Benefits comparison table: price, meals funded, tables, race entries, logo size, recognition, by level
- Commitment form with level checkboxes, sponsor details, a payment dropdown, logo instructions and two signatures
What's inside
The document has 3 pages. Each part below is a heading in the file, so you can jump to it from the Navigation Pane (View > Navigation Pane).
| Part | What it covers | What you write |
|---|---|---|
| Page 1: the case | Why a company should care | Title, story, event details, quote; sidebar with four impact numbers |
| Page 2: the levels | What each level gets | Benefits comparison table, deadline, past sponsors |
| Page 3: commitment form | How to say yes | Level checkboxes, company and contact, payment, logo, signatures |
Before you start
- Pick three or four impact numbers you can prove from last year’s report.
- Cost out each benefit (tables, shirts, banners) so every level still leaves a real donation after costs.
- Get permission from past sponsors before listing them or quoting them.
Step-by-step guide
Write the title
Type the campaign or event name and a subtitle that says what is being sponsored.
Tell the story
Two short paragraphs: the problem in your community, and how the events fund the answer. Then pick the event dates.
Update the sidebar
Type over each big number and its label with last year’s results.
Set the levels
Edit prices and benefits in the comparison table. Use ✓ and — so the differences are easy to scan.
Set the deadline
Pick the logo deadline date so sponsors know when to commit to appear on printed materials.
Send the form
Save as PDF for the pitch, and send the Word file to sponsors who want to fill in the form.
Field and control map
Every content control and field in the document, in the order they appear. Gray-boxed fields in Word are the content controls.
| Name | Type | Where | Value in the sample |
|---|---|---|---|
| Org header | Text | Header | Harbor City Food Bank |
| Packet title | Text | Body | Feed the Harbor 2027 |
| Packet subtitle | Text | Body | Sponsorship opportunities for the Annual Harvest Gala and 5K |
| Gala date | Date picker | Body | April 17, 2027 |
| 5K date | Date picker | Body | September 12, 2027 |
| Impact 1 value | Text | Body | 6.2M |
| Impact 1 label | Text | Body | meals distributed |
| Impact 2 value | Text | Body | 41,000 |
| Impact 2 label | Text | Body | people served each month |
| Impact 3 value | Text | Body | 94% |
| Impact 3 label | Text | Body | of spending goes to programs |
| Impact 4 value | Text | Body | $1 = 3 |
| Impact 4 label | Text | Body | meals for every dollar given |
| Logo deadline | Date picker | Body | February 26, 2027 |
| Contact name | Text | Body | Jordan Ellis, Partnerships Director |
| Contact email | Text | Body | jellis@harborcityfood.example |
| Tier gold | Checkbox | Body | unchecked |
| Tier bronze | Checkbox | Body | unchecked |
| Tier silver | Checkbox | Body | checked |
| Tier custom | Checkbox | Body | unchecked |
| Custom amount | Text | Body | Click or tap to enter text. |
| Sponsor company | Text | Body | Tidewater Logistics |
| Sponsor contact | Text | Body | Priya Natarajan, Marketing Manager |
| Sponsor email | Text | Body | pnatarajan@tidewater.example · (410) 555-0181 |
| Payment | Dropdown | Body | Invoice (Check / Credit card / Invoice / Pledge in installments) |
| Logo email | Text | Body | events@harborcityfood.example |
| Sig sponsor | Text | Body | Priya Natarajan |
| Signed date | Date picker | Body | 2 fields: Click or tap to enter a date. |
| Sig org | Text | Body | Jordan Ellis |
{ PAGE } | Field | Footer | 1 |
{ NUMPAGES } | Field | Footer | 3 |
{ SEQ Table \* ARABIC } | Field | Body | 1 |
Every field, control and style, explained
The code in each card is read straight from the .docx file (the XML Word stores, or the field code you see with Alt+F9), so it is exactly what the template contains.
Page { PAGE } of { NUMPAGES }The footer counts pages with two fields: PAGE is the current page and NUMPAGES is the total. Both recalculate when the document is printed, saved as PDF or scrolled in Print Layout.
Piece by piece
PAGE- The number of the page the field sits on.
NUMPAGES- The total number of pages in the document.
In the sample: Page 1 of 3 on the first page
How it is used: Nothing to do: add or delete pages and the numbers follow.
How to change it: Double-click the footer to edit the text around the fields. Insert > Page Number > Format Page Numbers sets the starting number.
Learn this: How to Set Up Pages in Word: Margins, Breaks, Headers, Footers, and Page Numbers →{ SEQ Table \* ARABIC }Each table caption uses a SEQ field that counts tables in order. Insert a new captioned table in the middle and every later caption renumbers.
Piece by piece
SEQ Table- A counter named "Table". Every SEQ Table field adds 1.
\* ARABIC- Show the counter as 1, 2, 3.
In the sample: 1 caption(s): Table 1
How it is used: Captions are what a "see Table 2" cross-reference points to (References > Cross-reference).
How to change it: References > Insert Caption adds a new one. If numbers look stale, press Ctrl+A then F9 to update all fields.
Learn this: How to Add a Table of Contents, Captions, and Cross-References in Word →<w:sdtPr>
<w:alias w:val="Packet title"/>
<w:tag w:val="packet_title"/>
<w:text/>
</w:sdtPr>Names, numbers and other details people change every time are plain text content controls. Click one and type: the text replaces the sample, keeps the formatting, and the field still shows its name when selected.
Piece by piece
<w:alias w:val="…"/>- The title shown on the control’s tab when you click it.
<w:tag w:val="…"/>- A machine-readable name, useful for mail merge or code.
<w:text/>- Plain text: one line, one format, so pasted text cannot break the layout.
<w:showingPlcHdr/>- Present when the field shows gray placeholder text instead of a value.
In the sample: Packet title = Feed the Harbor 2027
How it is used: 20 in this template: Org header, Packet title, Packet subtitle, Impact 1 value, Impact 1 label, Impact 2 value, Impact 2 label, Impact 3 value, Impact 3 label, Impact 4 value, Impact 4 label, Contact name, Contact email, Custom amount, Sponsor company, Sponsor contact, Sponsor email, Logo email, Sig sponsor, Sig org. Use Developer > Design Mode to see every control at once, or the Selection Pane to jump between them.
How to change it: Developer > Properties changes the title, tag and placeholder. To show the Developer tab: File > Options > Customize Ribbon > Developer.
Learn this: How to Create Fillable Forms with Content Controls in Word →<w:sdtPr>
<w:alias w:val="Gala date"/>
<w:tag w:val="gala_date"/>
<w:date w:fullDate="2027-04-17T00:00:00Z">
<w:dateFormat w:val="MMMM d, yyyy"/>
<w:lid w:val="en-US"/>
<w:storeMappedDataAs w:val="dateTime"/>
<w:calendar w:val="gregorian"/>
</w:date>
</w:sdtPr>Dates are date picker content controls: click the arrow to pick from a calendar, or type a date in any format and Word shows it as "November 2, 2026".
Piece by piece
w:fullDate- The stored date, independent of how it is shown.
<w:dateFormat w:val="MMMM d, yyyy"/>- Display format: full month name, day, four-digit year.
<w:lid w:val="en-US"/>- Language used for month names.
<w:storeMappedDataAs w:val="dateTime"/>- Stores a real date value if the control is mapped to data.
In the sample: Gala date = April 17, 2027
How it is used: 5 in this template: Gala date, 5K date, Logo deadline, Signed date. Pick the date from the calendar so every date in the document has the same format.
How to change it: Developer > Properties > Display the date like this, for example d MMMM yyyy or yyyy-MM-dd.
Learn this: How to Create Fillable Forms with Content Controls in Word →<w:sdtPr>
<w:alias w:val="Payment"/>
<w:tag w:val="payment"/>
<w:dropDownList>
<w:listItem w:displayText="Check" w:value="Check"/>
<w:listItem w:displayText="Credit card" w:value="Credit card"/>
<w:listItem w:displayText="Invoice" w:value="Invoice"/>
<w:listItem w:displayText="Pledge in installments" w:value="Pledge in installments"/>
</w:dropDownList>
</w:sdtPr>Fields with a fixed set of answers are dropdown list content controls, so everyone uses the same words (useful when you search or count documents later).
Piece by piece
<w:dropDownList>- A list the reader must pick from (no free typing).
<w:listItem w:displayText="…" w:value="…"/>- One choice: the text shown and the value stored.
In the sample: Payment = Invoice (Check / Credit card / Invoice / Pledge in installments)
How it is used: 1 in this template: Payment. Click the field and choose from the list.
How to change it: Developer > Properties > Add, Modify or Remove choices. Use a Combo Box instead if people need to type their own answer.
Learn this: How to Create Fillable Forms with Content Controls in Word →<w:sdtPr>
<w:alias w:val="Tier gold"/>
<w:tag w:val="tier_gold"/>
<w14:checkbox>
<w14:checked w14:val="0"/>
<w14:checkedState w14:val="2612" w14:font="MS Gothic"/>
<w14:uncheckedState w14:val="2610" w14:font="MS Gothic"/>
</w14:checkbox>
</w:sdtPr>Checklist boxes are checkbox content controls: click to tick or untick. They print as ☒ and ☐.
Piece by piece
<w14:checked w14:val="…"/>- 1 when ticked, 0 when not.
<w14:checkedState w14:val="2612"/>- Symbol for ticked: U+2612 ☒.
<w14:uncheckedState w14:val="2610"/>- Symbol for unticked: U+2610 ☐.
In the sample: 1 of 4 ticked in the sample
How it is used: 4 in this template: Tier gold, Tier bronze, Tier silver, Tier custom. Click the box. Checkboxes need Word 2010 or later; very old versions show a static symbol.
How to change it: Developer > Properties > Checked symbol > Change, for example to ✓ (Wingdings 2).
Learn this: How to Create Fillable Forms with Content Controls in Word →<w:trPr>
<w:cantSplit/>
<w:tblHeader/>
</w:trPr>Header rows are marked to repeat at the top of each page when a table breaks, and rows are set not to split across pages, so a long table stays readable when printed.
Piece by piece
<w:tblHeader/>- Repeat this row at the top of each page.
<w:cantSplit/>- Keep each row on one page.
In the sample: 1 of 5 tables repeat their header row
How it is used: Add rows with Tab in the last cell; the header keeps repeating.
How to change it: Click in the header row > Table Layout > Repeat Header Rows. Short tables are also set to keep with the next paragraph so they do not split.
Learn this: How to Build and Format Tables That Read Well in Word →<w:style w:type="paragraph" w:styleId="PullQuote">
<w:name w:val="Pull Quote"/>
<w:basedOn w:val="Normal"/>
<w:next w:val="Normal"/>
<w:pPr>
<w:keepNext/>
<w:pBdr>
<w:top w:val="single" w:color="F2A93B" w:sz="12" w:space="8"/>
</w:pBdr>
<w:spacing w:after="80" w:before="280" w:line="300"/>
<w:ind w:left="720" w:right="720"/>
</w:pPr>
<w:rPr>
<w:i/>
<w:iCs/>
<w:color w:val="1E2A5A"/>
<w:sz w:val="30"/>
</w:rPr>
</w:style>Key sentences are repeated as pull quotes in a Pull Quote paragraph style: larger italic navy text between two amber rules. Readers who skim catch the argument; because it is a style, every quote matches.
Piece by piece
<w:i/>- Italic.
<w:sz w:val="30"/>- 15 pt (Word stores half-points).
<w:top w:val="single" w:sz="12" w:color="F2A93B"/>- Amber rule above; the source line carries the rule below.
<w:ind w:left="720" w:right="720"/>- Indented half an inch on both sides.
In the sample: Two pull quotes in the body, each with a source line.
How it is used: Type the quote, pick Pull Quote; put the source on the next line with Pull Quote Source.
How to change it: Right-click Pull Quote in the Styles gallery > Modify.
Learn this: How to Use Styles and the Navigation Pane in Word →<w:style w:type="paragraph" w:styleId="MetricValue">
<w:name w:val="Metric Value"/>
<w:basedOn w:val="Normal"/>
<w:next w:val="Normal"/>
<w:pPr>
<w:keepNext/>
<w:spacing w:after="0" w:before="120" w:line="240" w:lineRule="auto"/>
</w:pPr>
<w:rPr>
<w:b/>
<w:color w:val="1E2A5A"/>
<w:sz w:val="52"/>
</w:rPr>
</w:style>The page is a borderless two-column table: the story on the left and a shaded sidebar on the right. Big numbers use a Metric Value style and their labels a Metric Label style, so they line up and can be restyled together. A table keeps the sidebar next to the text in Word, Google Docs and PDF exports, which text boxes do not always do.
Piece by piece
<w:tblBorders> none- No visible borders, so it reads as a page layout, not a table.
<w:shd w:fill="EEF2F8"/>- Shaded sidebar cell.
Metric Value- 26 pt bold navy number, kept with its label.
Metric Label- Small gray label with a thin rule under it.
In the sample: Four metrics in the sidebar, each a Metric Value and a Metric Label paragraph.
How it is used: Click in the sidebar and type over a number or label. Show gridlines (Table Layout > View Gridlines) to see the columns while editing.
How to change it: Drag the column border to change widths, or change the sidebar shading under Table Design > Shading.
Learn this: How to Build and Format Tables That Read Well in Word →Tips and limits
- Put the price in the first row of the table; sponsors look for it first.
- Make benefits concrete (“2 tables of 10”) rather than vague (“premium visibility”).
- Leave a custom option. Many sponsors want in-kind or single-event packages.
- Ask a tax adviser how to describe the deductible amount when sponsors receive benefits such as gala seats.
- The sidebar is a borderless table; keep the main column starting with a paragraph so it stays on the first page.
Learn the skills behind this template
Was this guide helpful? Spot a mistake? Send feedback · admin@arumsoft.com