Film and Video Production Call Sheet Template for Word
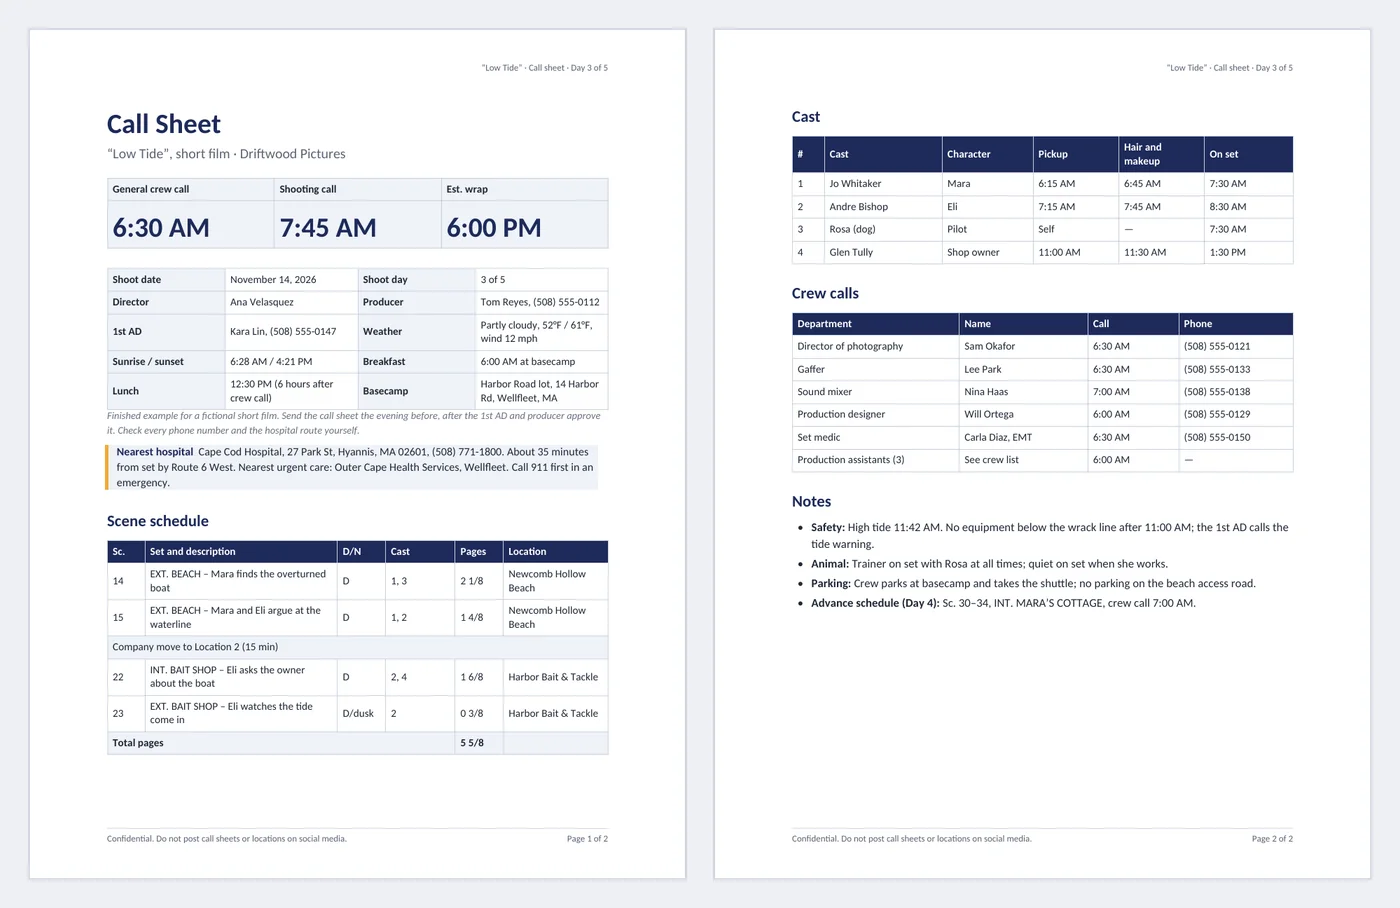
A call sheet tells every cast and crew member where to be, when, and what is being shot, and it is the first thing anyone reaches for when something goes wrong on set. This template is a finished two-page call sheet for a fictional short film shooting on a beach: the three call times in large type at the top, the day’s scenes in shooting order with page counts, cast pickup and makeup times, crew calls, the nearest hospital, and tide and safety notes.
- Pages:
- 2
- Works with:
- Word for Microsoft 365, Word 2016 or later, Word for Mac (Word for the web can fill in fields)
- Updated:
What you can do with it
- Crew call, shooting call and estimated wrap in large Metric Value type
- Shoot date picker, day X of Y, director, producer, 1st AD, weather dropdown, sunrise and sunset, meals and basecamp
- Nearest hospital callout and a scene schedule with D/N, cast numbers, pages and location, including a company move row
- Cast table (pickup, hair and makeup, on set), crew calls with phone numbers, and safety and advance-schedule notes
What's inside
The document has 2 pages. Each part below is a heading in the file, so you can jump to it from the Navigation Pane (View > Navigation Pane).
| Part | What it covers | What you write |
|---|---|---|
| Call times | When the day starts and ends | Crew call, shooting call, estimated wrap |
| Day block | The essentials for everyone | Date, day count, key contacts, weather, sun times, meals, basecamp |
| Hospital | Where to go in an emergency | Name, address, phone, drive time, urgent care |
| Scene schedule | What is shot, in order | Scene, set, D/N, cast, pages, location, moves, total pages |
| Cast, crew and notes | Who is needed when | Pickup and makeup times, crew calls and phones, safety, parking, tomorrow’s plan |
Before you start
- Lock the next day’s schedule with the director and 1st AD; the call sheet follows it.
- Check the forecast, sunrise and sunset, and anything else that changes the day (tides, permits, road closures).
- Drive or map the route from set to the nearest emergency room and confirm it is open 24 hours.
Step-by-step guide
Set the call times
Type over the three large times. Crew call is when work starts; shooting call is when the first shot rolls.
Fill in the day block
Pick the date and weather, and type the day count, key contacts, sun times, meals and basecamp address.
Update the hospital box
Type the nearest emergency room, its address, phone and drive time, plus the nearest urgent care.
Build the scene schedule
One row per scene in shooting order, with a full-width row for each company move, and the total pages at the bottom.
Set cast and crew calls
Work back from each actor’s first scene to their makeup and pickup times; list crew departments with phone numbers.
Add notes and send
Add safety and logistics notes and tomorrow’s advance schedule, save as PDF and send the evening before.
Field and control map
Every content control and field in the document, in the order they appear. Gray-boxed fields in Word are the content controls.
| Name | Type | Where | Value in the sample |
|---|---|---|---|
| Production header | Text | Header | “Low Tide” |
| Shoot day header | Text | Header | 3 |
| Total days header | Text | Header | 5 |
| Production | Text | Body | “Low Tide”, short film |
| Company | Text | Body | Driftwood Pictures |
| Crew call | Text | Body | 6:30 AM |
| Shooting call | Text | Body | 7:45 AM |
| Wrap | Text | Body | 6:00 PM |
| Shoot date | Date picker | Body | November 14, 2026 |
| Shoot day | Text | Body | 3 |
| Total days | Text | Body | 5 |
| Director | Text | Body | Ana Velasquez |
| Producer | Text | Body | Tom Reyes, (508) 555-0112 |
| First AD | Text | Body | Kara Lin, (508) 555-0147 |
| Weather | Dropdown | Body | Partly cloudy, 52°F / 61°F, wind 12 mph (Clear / Partly cloudy, 52°F / 61°F, wind 12 mph / Rain / Snow / Extreme heat) |
| Sun times | Text | Body | 6:28 AM / 4:21 PM |
| Breakfast | Text | Body | 6:00 AM at basecamp |
| Lunch | Text | Body | 12:30 PM (6 hours after crew call) |
| Basecamp | Text | Body | Harbor Road lot, 14 Harbor Rd, Wellfleet, MA |
| Hospital | Text | Body | Cape Cod Hospital, 27 Park St, Hyannis, MA 02601, (508) 771-1800. About 35 minutes from set by Route 6 West. Nearest urgent care: Outer Cape Health Services, Wellfleet. |
{ PAGE } | Field | Footer | 1 |
{ NUMPAGES } | Field | Footer | 2 |
Every field, control and style, explained
The code in each card is read straight from the .docx file (the XML Word stores, or the field code you see with Alt+F9), so it is exactly what the template contains.
Page { PAGE } of { NUMPAGES }The footer counts pages with two fields: PAGE is the current page and NUMPAGES is the total. Both recalculate when the document is printed, saved as PDF or scrolled in Print Layout.
Piece by piece
PAGE- The number of the page the field sits on.
NUMPAGES- The total number of pages in the document.
In the sample: Page 1 of 2 on the first page
How it is used: Nothing to do: add or delete pages and the numbers follow.
How to change it: Double-click the footer to edit the text around the fields. Insert > Page Number > Format Page Numbers sets the starting number.
Learn this: How to Set Up Pages in Word: Margins, Breaks, Headers, Footers, and Page Numbers →<w:sdtPr>
<w:alias w:val="Production"/>
<w:tag w:val="production"/>
<w:text/>
</w:sdtPr>Names, numbers and other details people change every time are plain text content controls. Click one and type: the text replaces the sample, keeps the formatting, and the field still shows its name when selected.
Piece by piece
<w:alias w:val="…"/>- The title shown on the control’s tab when you click it.
<w:tag w:val="…"/>- A machine-readable name, useful for mail merge or code.
<w:text/>- Plain text: one line, one format, so pasted text cannot break the layout.
<w:showingPlcHdr/>- Present when the field shows gray placeholder text instead of a value.
In the sample: Production = “Low Tide”, short film
How it is used: 18 in this template: Production header, Shoot day header, Total days header, Production, Company, Crew call, Shooting call, Wrap, Shoot day, Total days, Director, Producer, First AD, Sun times, Breakfast, Lunch, Basecamp, Hospital. Use Developer > Design Mode to see every control at once, or the Selection Pane to jump between them.
How to change it: Developer > Properties changes the title, tag and placeholder. To show the Developer tab: File > Options > Customize Ribbon > Developer.
Learn this: How to Create Fillable Forms with Content Controls in Word →<w:sdtPr>
<w:alias w:val="Shoot date"/>
<w:tag w:val="shoot_date"/>
<w:date w:fullDate="2026-11-14T00:00:00Z">
<w:dateFormat w:val="MMMM d, yyyy"/>
<w:lid w:val="en-US"/>
<w:storeMappedDataAs w:val="dateTime"/>
<w:calendar w:val="gregorian"/>
</w:date>
</w:sdtPr>Dates are date picker content controls: click the arrow to pick from a calendar, or type a date in any format and Word shows it as "November 2, 2026".
Piece by piece
w:fullDate- The stored date, independent of how it is shown.
<w:dateFormat w:val="MMMM d, yyyy"/>- Display format: full month name, day, four-digit year.
<w:lid w:val="en-US"/>- Language used for month names.
<w:storeMappedDataAs w:val="dateTime"/>- Stores a real date value if the control is mapped to data.
In the sample: Shoot date = November 14, 2026
How it is used: 1 in this template: Shoot date. Pick the date from the calendar so every date in the document has the same format.
How to change it: Developer > Properties > Display the date like this, for example d MMMM yyyy or yyyy-MM-dd.
Learn this: How to Create Fillable Forms with Content Controls in Word →<w:sdtPr>
<w:alias w:val="Weather"/>
<w:tag w:val="weather"/>
<w:dropDownList>
<w:listItem w:displayText="Clear" w:value="Clear"/>
<w:listItem w:displayText="Partly cloudy, 52°F / 61°F, wind 12 mph" w:value="Partly cloudy, 52°F / 61°F, wind 12 mph"/>
<w:listItem w:displayText="Rain" w:value="Rain"/>
<w:listItem w:displayText="Snow" w:value="Snow"/>
<w:listItem w:displayText="Extreme heat" w:value="Extreme heat"/>
</w:dropDownList>
</w:sdtPr>Fields with a fixed set of answers are dropdown list content controls, so everyone uses the same words (useful when you search or count documents later).
Piece by piece
<w:dropDownList>- A list the reader must pick from (no free typing).
<w:listItem w:displayText="…" w:value="…"/>- One choice: the text shown and the value stored.
In the sample: Weather = Partly cloudy, 52°F / 61°F, wind 12 mph (Clear / Partly cloudy, 52°F / 61°F, wind 12 mph / Rain / Snow / Extreme heat)
How it is used: 1 in this template: Weather. Click the field and choose from the list.
How to change it: Developer > Properties > Add, Modify or Remove choices. Use a Combo Box instead if people need to type their own answer.
Learn this: How to Create Fillable Forms with Content Controls in Word →<w:style w:type="paragraph" w:styleId="Callout">
<w:name w:val="Callout"/>
<w:basedOn w:val="Normal"/>
<w:pPr>
<w:pBdr>
<w:left w:val="single" w:color="F2A93B" w:sz="24" w:space="8"/>
</w:pBdr>
<w:shd w:fill="EEF2F8" w:color="auto" w:val="clear"/>
<w:spacing w:after="160" w:before="120"/>
<w:ind w:left="180" w:right="180"/>
</w:pPr>
<w:rPr>
<w:sz w:val="21"/>
</w:rPr>
</w:style>Notes and warnings use a paragraph style named Callout: tinted background, amber bar on the left, indented on both sides. Because it is a style, every callout matches and you can restyle them all at once.
Piece by piece
<w:shd w:fill="EEF2F8"/>- Light blue-gray background.
<w:left w:val="single" w:sz="24" w:color="F2A93B"/>- Amber bar, 3 pt wide, on the left edge.
<w:ind w:left="180" w:right="180"/>- Indented 1/8 inch on each side.
In the sample: Used for the notes, tips and warnings in the body.
How it is used: Put the cursor in a paragraph and pick Callout in the Styles gallery.
How to change it: Right-click Callout in the Styles gallery > Modify > Format > Border or Shading. All callouts change together.
Learn this: How to Use Styles and the Navigation Pane in Word →<w:trPr>
<w:cantSplit/>
<w:tblHeader/>
</w:trPr>Header rows are marked to repeat at the top of each page when a table breaks, and rows are set not to split across pages, so a long table stays readable when printed.
Piece by piece
<w:tblHeader/>- Repeat this row at the top of each page.
<w:cantSplit/>- Keep each row on one page.
In the sample: 3 of 5 tables repeat their header row
How it is used: Add rows with Tab in the last cell; the header keeps repeating.
How to change it: Click in the header row > Table Layout > Repeat Header Rows. Short tables are also set to keep with the next paragraph so they do not split.
Learn this: How to Build and Format Tables That Read Well in Word →<w:style w:type="paragraph" w:styleId="MetricValue">
<w:name w:val="Metric Value"/>
<w:basedOn w:val="Normal"/>
<w:next w:val="Normal"/>
<w:pPr>
<w:keepNext/>
<w:spacing w:after="0" w:before="120" w:line="240" w:lineRule="auto"/>
</w:pPr>
<w:rPr>
<w:b/>
<w:color w:val="1E2A5A"/>
<w:sz w:val="52"/>
</w:rPr>
</w:style>The page is a borderless two-column table: the story on the left and a shaded sidebar on the right. Big numbers use a Metric Value style and their labels a Metric Label style, so they line up and can be restyled together. A table keeps the sidebar next to the text in Word, Google Docs and PDF exports, which text boxes do not always do.
Piece by piece
<w:tblBorders> none- No visible borders, so it reads as a page layout, not a table.
<w:shd w:fill="EEF2F8"/>- Shaded sidebar cell.
Metric Value- 26 pt bold navy number, kept with its label.
Metric Label- Small gray label with a thin rule under it.
In the sample: Four metrics in the sidebar, each a Metric Value and a Metric Label paragraph.
How it is used: Click in the sidebar and type over a number or label. Show gridlines (Table Layout > View Gridlines) to see the columns while editing.
How to change it: Drag the column border to change widths, or change the sidebar shading under Table Design > Shading.
Learn this: How to Build and Format Tables That Read Well in Word →<w:style w:type="paragraph" w:styleId="Guidance">
<w:name w:val="Guidance"/>
<w:basedOn w:val="Normal"/>
<w:pPr>
<w:spacing w:after="100"/>
</w:pPr>
<w:rPr>
<w:i/>
<w:iCs/>
<w:color w:val="6B7280"/>
<w:sz w:val="19"/>
</w:rPr>
</w:style>Instructions for whoever fills in the template use a Guidance style (gray italics). Delete them before you send the document; with a style, Find and Replace can remove them all at once.
Piece by piece
<w:i/>- Italic.
<w:color w:val="6B7280"/>- Gray text.
In the sample: One note under the title block.
How it is used: Home > Replace > More > Format > Style > Guidance finds every note.
How to change it: Right-click Guidance in the Styles gallery > Modify.
Learn this: How to Use Styles and the Navigation Pane in Word →Tips and limits
- Plan lunch no later than six hours after crew call; many union and guild rules require it.
- Page counts use eighths of a page (2 4/8), the standard script measure.
- Put the hospital and any safety warning near the top so they are seen without scrolling.
- Number cast the same way on every call sheet and in the scene schedule.
- Mark the sheet “Confidential” and keep locations off social media.
Learn the skills behind this template
Was this guide helpful? Spot a mistake? Send feedback · admin@arumsoft.com